TL;DR:
To make WordPress fast on a vanilla Linux Web App, add app setting WEBSITES_ENABLE_APP_CACHE=true then redeploy your app, and ensure that you are not relying on filesystem (i.e. use Azure Blob or S3, deploy updates instead of live update plugins, etc)
App service on linux has been around for some time now, and as of PHP 8, it is now unsupported to run PHP on App Service on Windows. This blog was hosted on PHP 7.4 on Linux App Service and was very easy to manually deploy – I just created an app service (B1) and a MySQL Flexible Server (B1s), both on a basic tier, copied the files and DB over, and it cost only 60p per day = approx. £18 a month, well within my Visual Studio inclusive Azure credits, I was very happy… then I switched to PHP 8.
Firstly, be aware that once you change, you can’t go back! Then, be aware that they have changed from Apache to Nginx, so .htaccess file is not used any more. You will get 404 on any URLs not ending in .php. There is guidance on how to implement a rule in the nginx configuration to fix this here, using a custom startup script. Note you don’t need to create custom .sh file you can just put this into the Azure startup command:
cp /home/site/default /etc/nginx/sites-enabled/default; service nginx restart
I’m happy with this, the blog runs quick (TTFB = 0.4s). I like the simplicity of sticking as close as possible to vanilla PaaS service.
Which brings me to the main subject of this blog post. Another WordPress site I manage, this time a WooCommerce setup with 16 plugins. This site has been running fine on another platform but when we moved it into Azure App Service Linux the performance just turned abysmal – I’m talking just the time to return the homepage html document (TTFB) went up from about 0.8s to about 2.8s, and admin and shop pages even worse.
What I tried:
- Set app to Always On
- Scaling up the web app from S1 all the way to P1v3 made no difference
- Scaling up MySQL from B1ms to D2ads_v5 made no difference
- Check the metrics (CPU and Mem), nothing seems overloaded
- Setting FPM_MAX_CHILDREN=20 and some other settings after spotting a warning in the logs, made no difference
- Used Debug Bar plugin to check for slow MySQL queries and external HTTPS dependencies, but these were only taking about 200ms
- Enabling Redis Cache using the Redis Object Cache plugin, no difference
- Enabling WP-Optimize plugin, no difference unless I enable page level caching, which only benefits anonymous users.
Eventually I discovered that the bottleneck is disk I/O because App service runs the app from a network share. There are many discussions stating this is the cause, but not many with solutions.
This post hints at the PHP performance issues caused by disk IO and suggests you can use a custom container image, because then persistent storage is not used. This is probably another solution but I wanted to try and solve this while still running in vanilla web app, so not to have to maintain any docker images. The second option isn’t really viable, to make the app run from outside of /home. The third option is to use another hosting product! I was sure there must be an easier way to get the app running from local disk.
This post contains WordPress-specific app settings for Azure but I believe (some of) these only apply when using Microsoft’s WordPress marketplace template which uses a custom docker image (well, that aligns with the above post). Specifically, I had read that the appsetting WORDPRESS_LOCAL_STORAGE_CACHE_ENABLED = true would solve the performance issue, but it made no difference to my vanilla app. I span up a WordPress app via the portal to see how it is configured. Sure enough, it uses a container mcr.microsoft.com/appsvc/wordpress-alpine-php:8.2 and loads of the app settings referred to in the post.

Also I can see that they install W3 Total Cache and configure it to cache pages, using Redis Cache, and it uses Azure CDN. Fair enough, it is fast – under 300ms TTFB. This is all great, but I don’t want to add all this complexity into my existing app that hasn’t needed it before, I just want it to run as best it can without page caching. Anyway – half the shop can’t use this type of caching and none of the backoffice. I considered trying to use their image and deploy my WP into it, but decided to pursue more vanilla fix first (and there doesn’t seem to be much documentation for using it)… if you do decide to pursue this then the articles here would be useful.
This post validates that storage is slow on Linux web app, but the only suggestion is to mount premium SSD storage which is not supported for /home. Many people seem to have given up and hosted elsewhere, or are relying on caching plugins to improve performance to an acceptable level.
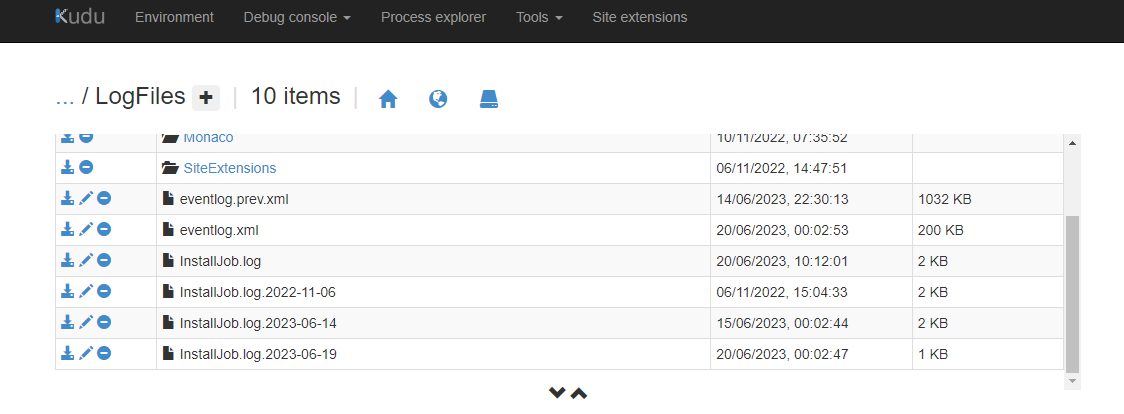
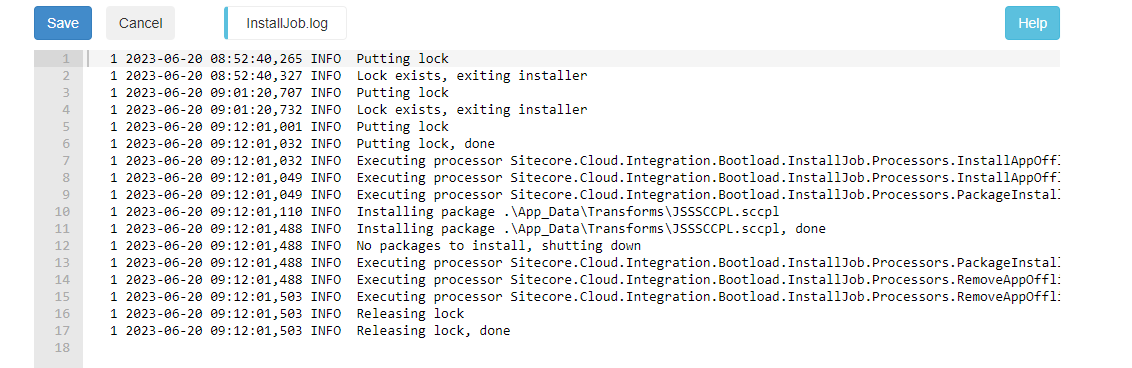
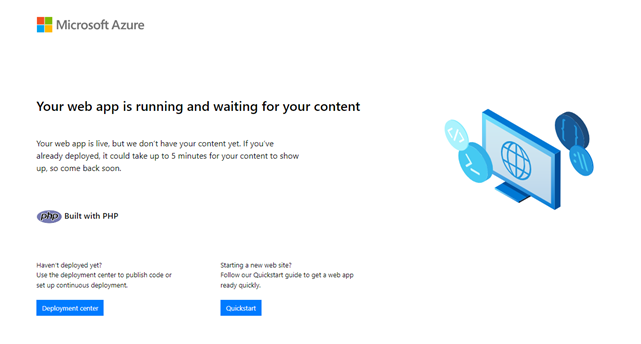
Finally I came across App Cache. Looks to be Linux equivalent of Local Cache. This post has been around since 2021 so I have no idea why it isn’t more popularised on the web. I tried it straight away – set WEBSITES_ENABLE_APP_CACHE=true. After enabling, my web app went back to the default state below, which was expected because it says you need to redeploy after changing the setting.
Then I redeployed the app (via Azure Devops – zip deploy) and it came back up as normal. Except – the homepage now returns in 500-600ms! This is even faster than it was on the previous hosting, and 4x faster than it was before adding the setting.
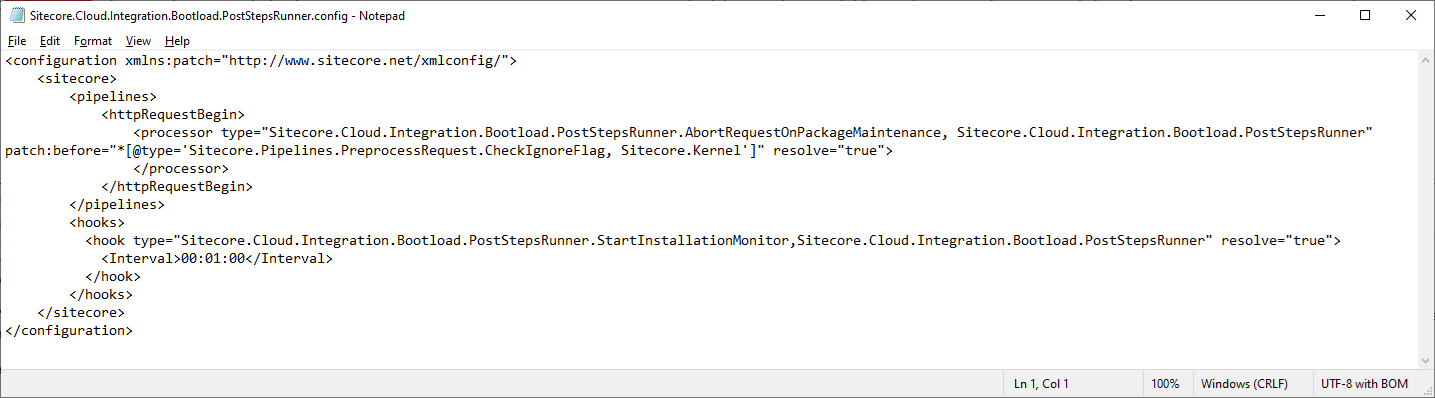
The only issue I’ve noticed so far, is that the nginx configuration I mentioned at the start of this post seems to have been lost. I will SSH in and investigate.

Turns out I now am logged into an “empty” instance with vanilla nginx config in /etc/sites-enabled/default and only the web files in /home and the site files are in /home/site/wwwroot:

I added into location / { try_files $uri $uri/ /index.php?$args; } using nano and then ran service nginx restart and sure enough 404 issue is fixed. But I assume it will return on next deploy/restart. Sure enough, after a restart I am back to 404 errors.
It seems the Startup Command is not working when App Cache is enabled… this is rather an annoying problem, as this is so close to a solution. Then I found this great post about deploying Drupal using App Cache, from only last month! The trick is, to put your custom nginx default file inside the repo (the opposite to the usual approach!), so that it gets deployed into wwwroot within the container. I assume that means, my Startup Command was probably failing because the file didn’t exist at /home/site/default! Yep, it works, with startup command “cp /home/site/wwwroot/nginx-default /etc/nginx/sites-enabled/default; service nginx restart”
During my investigation I noted down these alternatives to investigate:
- App Cache vs Run from Package – can the latter also solve this (if it even supports linux)?
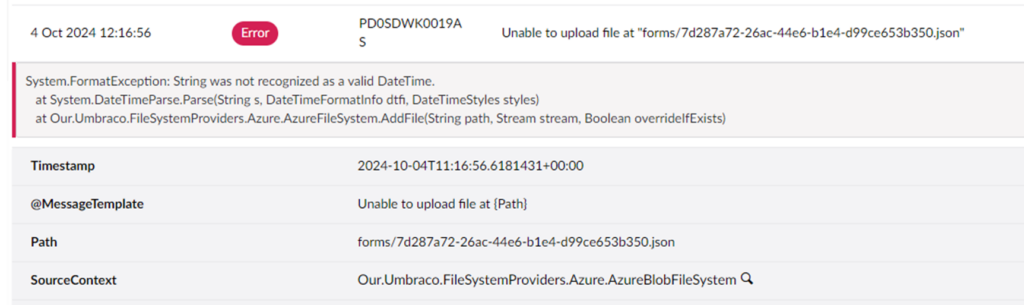
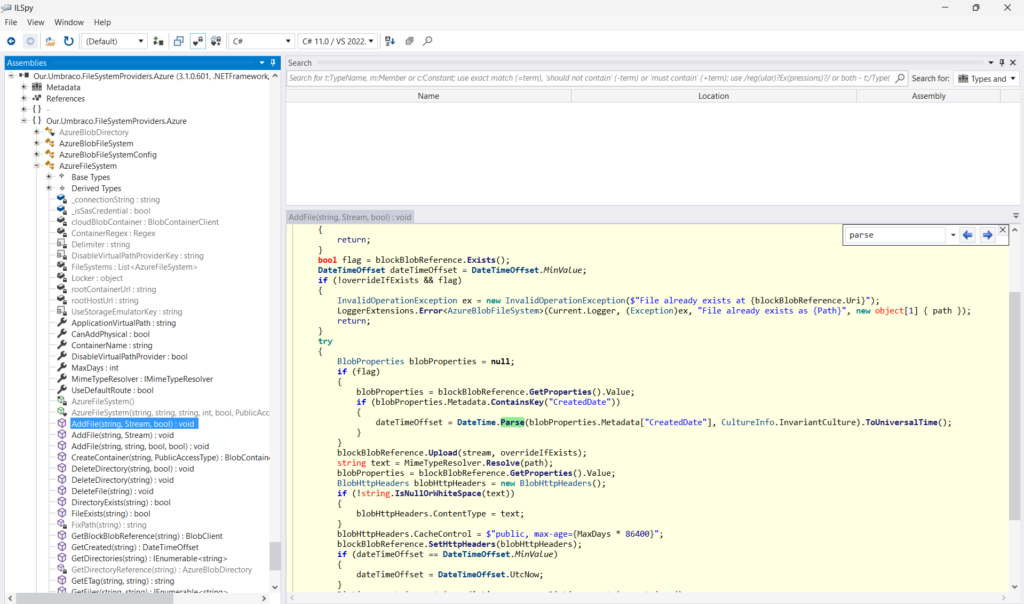
- Check if disk is really read-only with App Cache (as stated here) if so, does this cause errors? UPDATE – I don’t think it is read-only, as I am able to upload media successfully that is stored temporarily on disk.
- App Cache caveat – you can’t rely on local storage so must avoid doing “live” plugin updates etc, and use Azure Blob Storage or S3 for media file storage.
- Can we achieve this without App Cache by setting custom Site Root and startup script to copy the files out of /home?
- Try setting WEBSITES_ENABLE_APP_SERVICE_STORAGE=false to force /home not to use shared storage.
Strangely, that last setting also appears to work, without app cache. But, when trying to replicate this on another environment I could not get the performance improvement unless I enabled and then disabled App Cache! I think there is something strange going on. When I diff the environment variables the only difference is APPSVC_RUN_ZIP goes to ‘true’ once you do this. So I think this is doing something behind the scenes which also makes it fast (sounds a bit like ‘run from package’ doesn’t it…) although I can’t find any documentation about this.
While testing this setup I found I could no longer upload media files and got an error that the disk is read only “Unable to create directory wp-content/uploads/2023/11. Is its parent directory writable by the server?” so I think it is a non-starter anyway, given that App Cache is at least mostly documented I will use that approach.