Add Page Views column to the table on Sitecore Analytics Reports

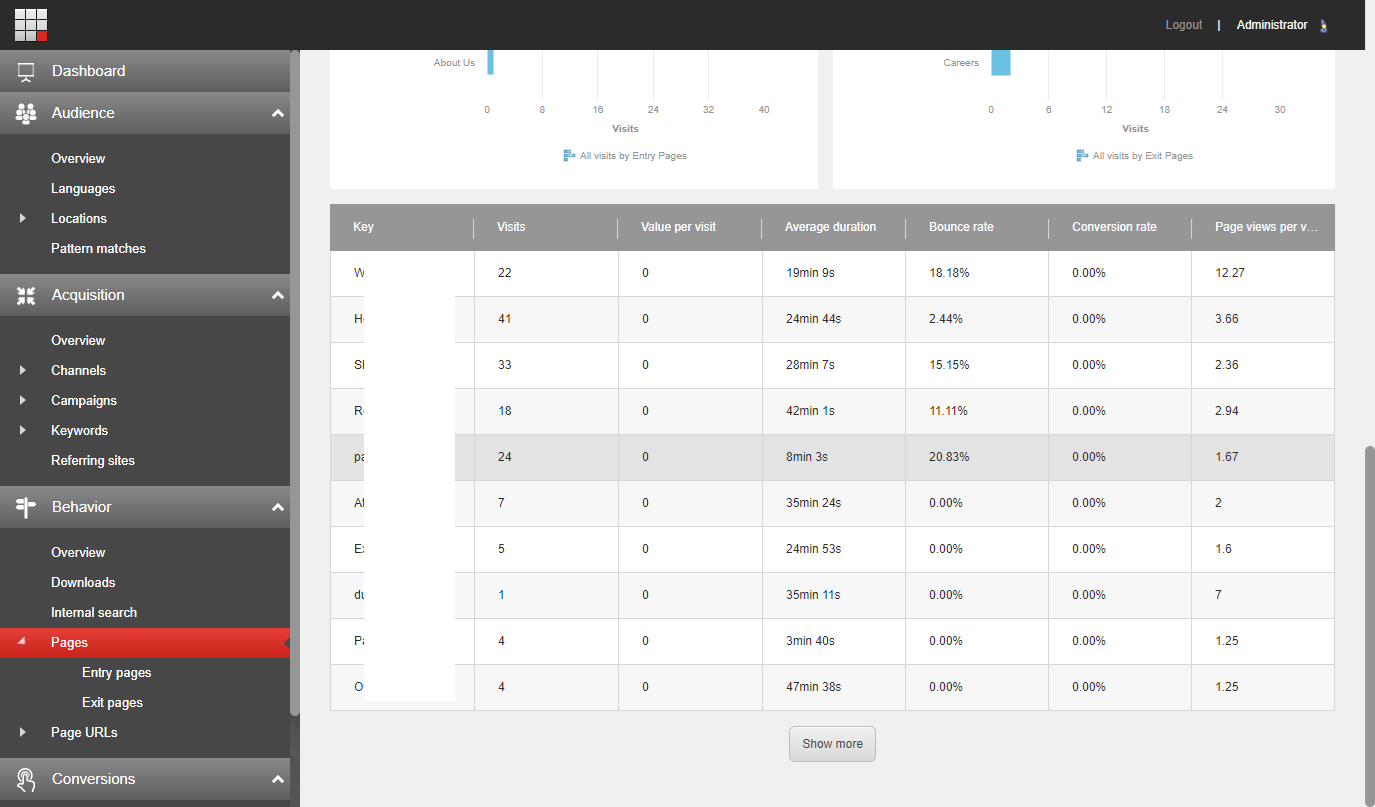
On many pages of the Sitecore Analytics dashboard, there is a table of visit data.

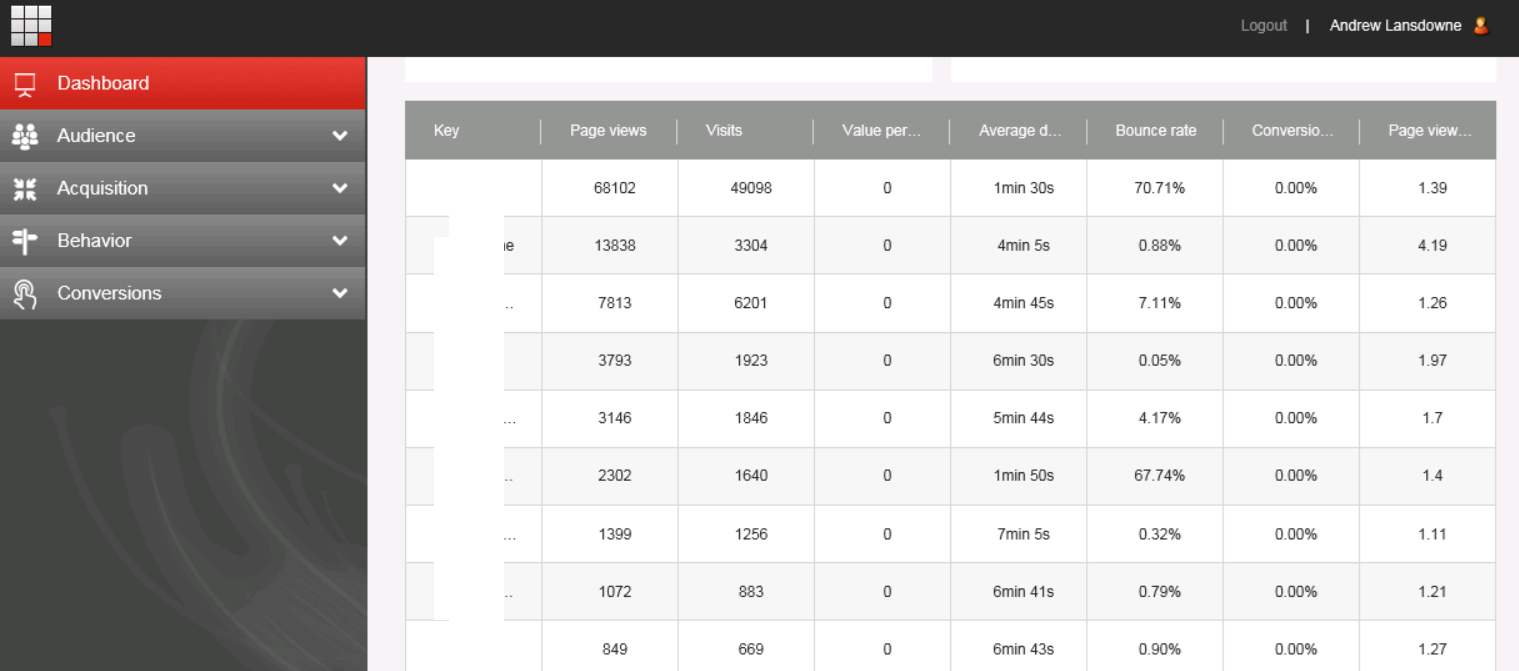
This by default is sorted by page views descending, but there is no page views column! The Visits column is actually the number of visits where at least one page view hit the page in question.

We were asked to add Page Views to this table, and it turned out to be incredibly easy.

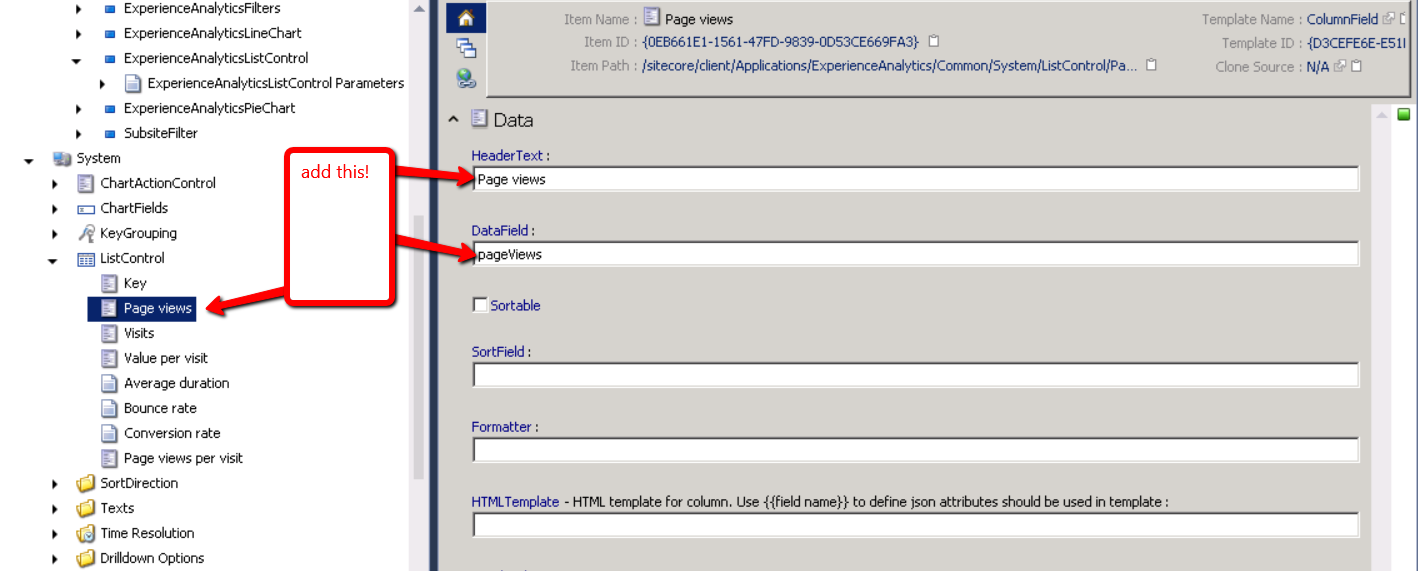
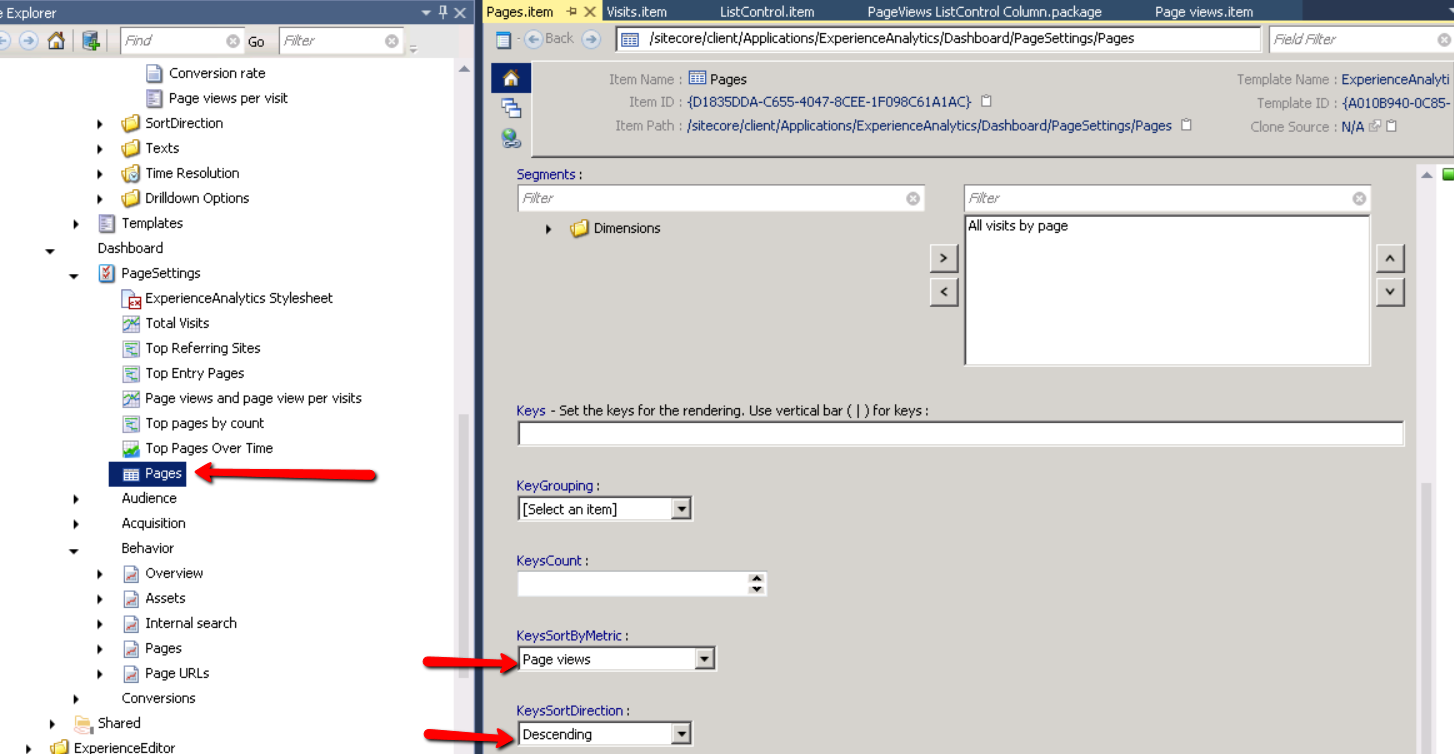
In the Core database, go to /Sitecore/client/Applications/ExperienceAnalytics/Common/System/ListControl and you’ll see all the headings from the above table are items under this one:


Simply duplicate the Visits item and change the header to “Page views” and data field to “pageViews” as per the above screenshot.

Hey presto:

Also worth pointing out you can set the default sort option here under the relevant ExperienceAnalyticsListControl Parameters item (see my previous post for more detail on customising the Analytics pages):


Deploying Sitecore Unicorn Items to Azure Web App using VSTS Build and Release

For years we have been using Unicorn to manage and deploy our developer-owned Sitecore items using TeamCity. Nowadays, we have moved to using VSTS for source code, build and release management, and Microsoft Azure for web app hosting. We struggled to set up a process akin to our TeamCity deployment process and Darren Guy’s epic blog series only covers Octopus Deploy.

I won’t go into setting up Unicorn as this is covered in the documentation. I will assume you have got it saving serialized files into source control and just outline the solution we have used to deploy the items.

We decided to put the Unicorn files into /App_Data/Unicorn so it is beneath the Webroot so can be deployed to, but protected from the public.

1. Configure the build to include Unicorn files

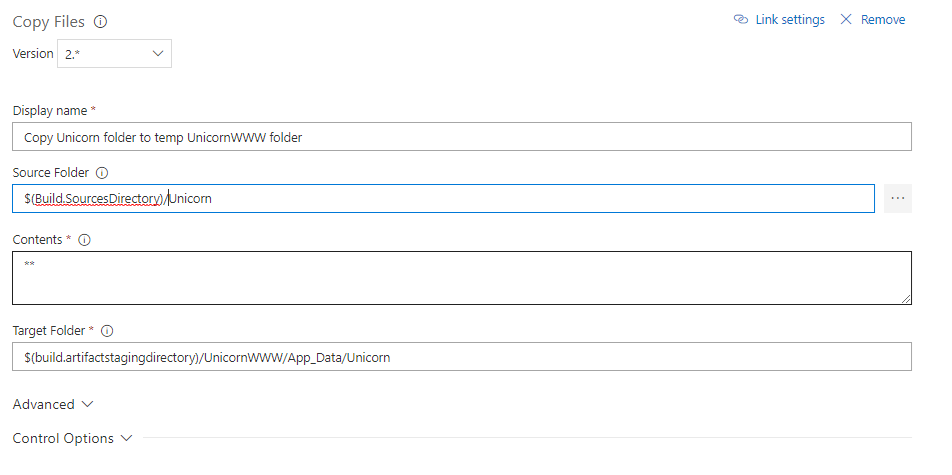
We used a Copy Files step to copy the Unicorn folder from source control into the artefact staging directory. This means the files are available at Release time. We’re copying it into a new folder “UnicornWWW” in the location under the website path that we want to deploy the items to (App_Data/Unicorn).

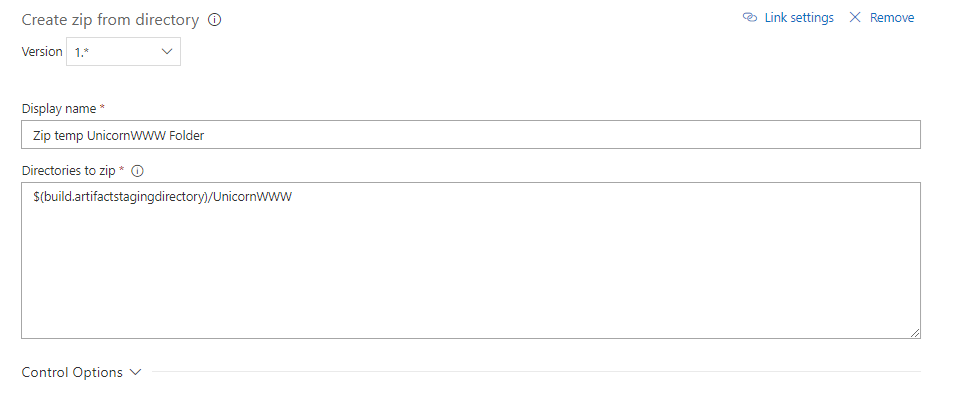
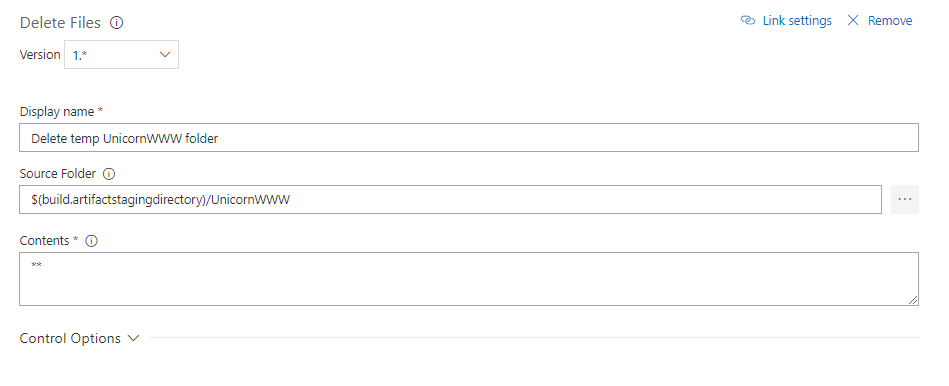
We also zip this folder up into a Unicorn.zip which contains the path within the website inside the zip, and delete the temporary folder as we don’t need it anymore.

Now the UnicornWWW.zip is a build artefact available at release time. You can check by going to the completed build summary page and checking the Artefacts tab, where the file should be listed.

2. Deploy the Unicorn files

This was tricky as we want to not only deploy the new files but also delete any old ones that have been removed from source control. We already had an Azure App Service Deploy step to deploy our web deploy package to the web app. What we did was add a post deployment script to this step which removes the Unicorn folder:


Then we have a follow up deployment which deploys the UnicornWWW.zip directly to the web app. As it has the App_Data/Unicorn folder inside it, the Unicorn files are deployed to the right place and the previous version have been deleted beforehand.

I believe it should be possible to do a manual msdeploy call inside a Powershell script where you could target a subfolder and do ‘sync’ to delete existing files, much like we do with TeamCity, but we haven’t got that working quite yet as not sure how the publish credentials would be taken out of the service principal setup that connects VSTS and Azure – it “just works” when you use the Azure App Service Deploy task so for now this is what we are sticking with.

3. Sync the Unicorn files

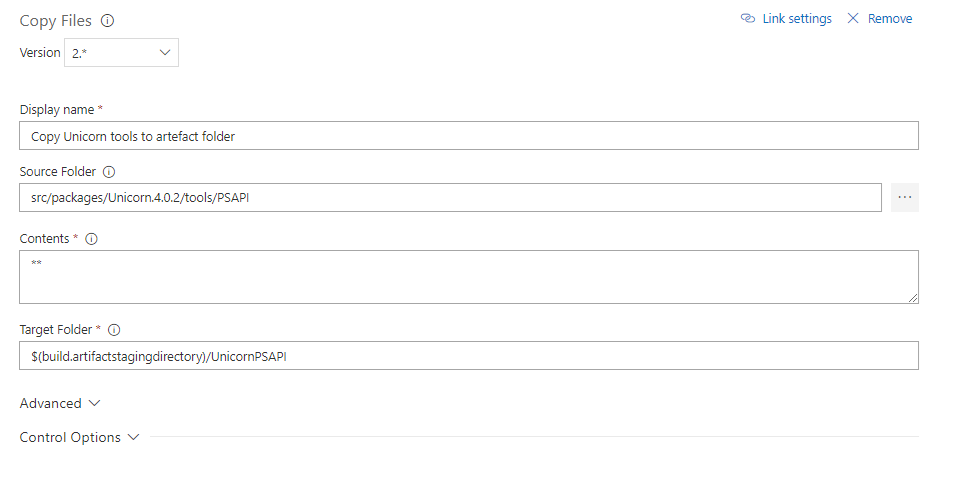
First we need a copy of the Unicorn Powershell API scripts available to the release agent. To do this we go back to the build and add a step to copy the Unicorn Tools PSAPI folder from the nuget package location into the build artefact folder:


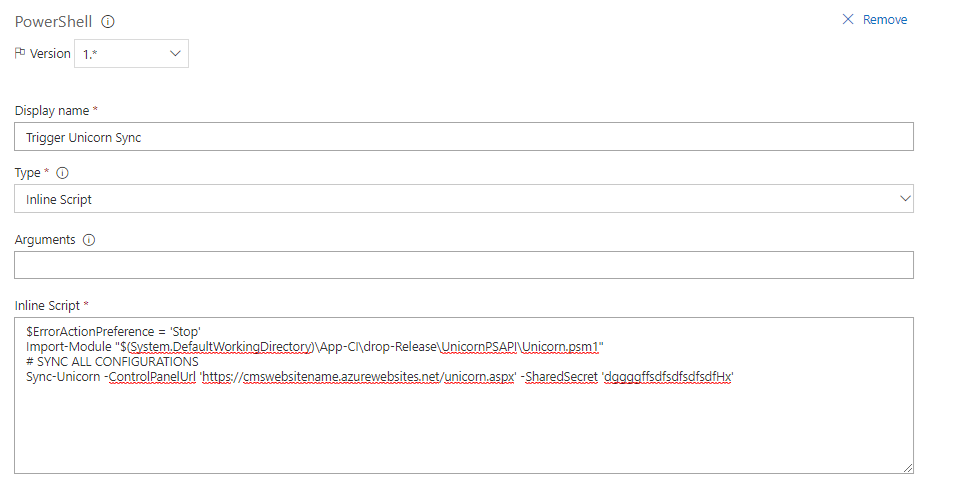
We then use a Powershell step which runs on the Release agent, which triggers Unicorn sync using the Unicorn Powershell API. This is based on the sample.ps1 from the PSAPI folder. Here we specify the environment URL + /unicorn.aspx and the shared secret that is configured as per Unicorn.UI.config.


The URL and secret can be made environment variables and then you have a fully automated deployment of Unicorn items to your Azure web app environment!

Customising Sitecore Experience Analytics Dashboard

We had a request to customise the default Experience Analytics dashboard on a Sitecore 8.1 site. With a little guidance from Sitecore we have been able to do this easily without development, but it is a bit of a convoluted process so I thought I would outline it here.

If possible, get your site live with Analytics configured correctly and capturing data well before you start looking at customising it, as you can then browse around the default analytics pages and see the real data that is captured. You can then give an analyst access and ask them what changes would be useful.

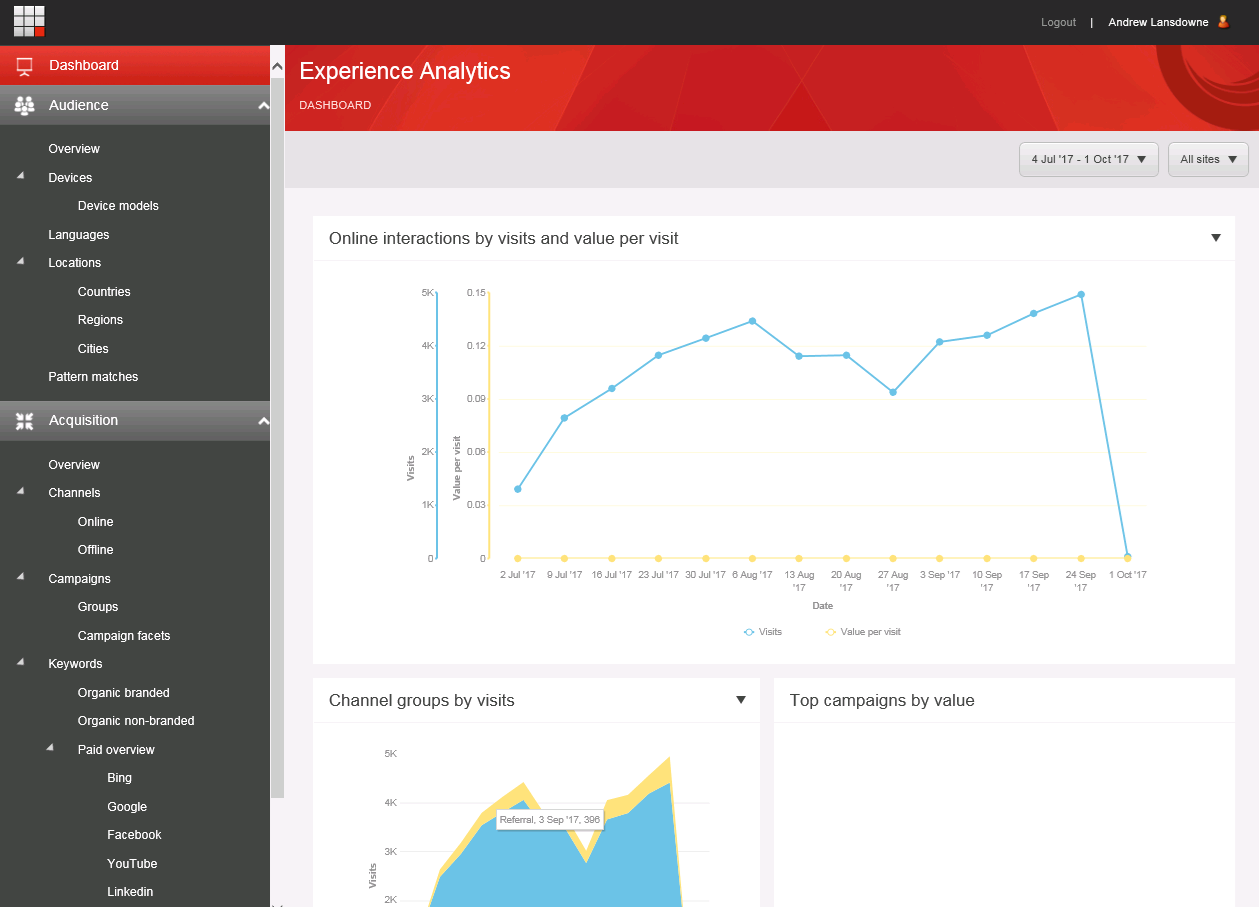
The default dashboard looks a little like this, on a site that hasn’t had any Analytics customisation done:

All the blocks apart from are ‘by value’ which means there is no data because no profiles / personas / experience scoring has been configured. Therefore, our analyst asked if the dashboard could be changed to include more common analytics like you might find on a Google Analytics dashboard.

  • Total Visits (line chart)
  • Top Referring Site (bar graph)
  • Top Entry Pages (bar graph)
  • Pageviews + Pageview/Visit (line chart)
  • Top pages (bar chart)
  • Top pages over time (line chart)
  • Top 10 pages (table)

These are all graphs that she found in other Analytics report pages, so all we had to do is figure out how to remove the existing charts from the dashboard and copy these from the other pages, creating a new dashboard layout.

The most relevant Sitecore documentation discusses how to create a new report page with a single chart. Using this and a bit of Sitecore knowledge you can figure out how to edit an existing complex dashboard.

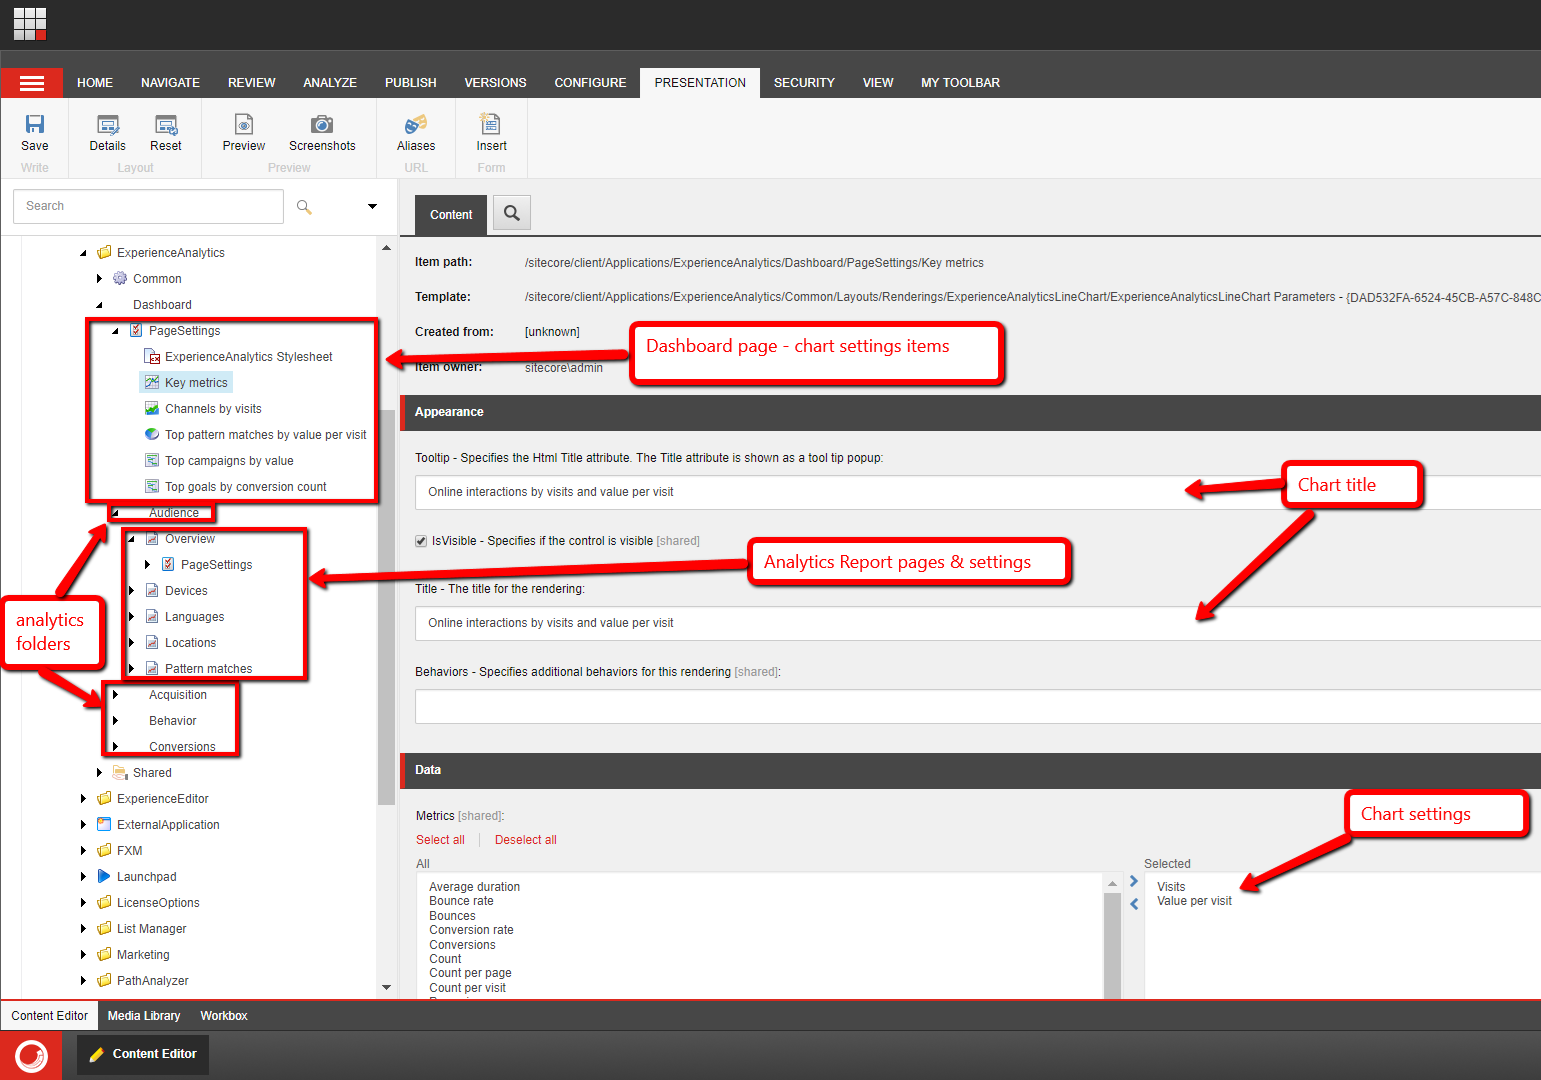
The analytics reports structure is stored as Sitecore items in the core database. You can view it by using Sitecore Desktop (link from the Sitecore launchpad) and switch to Core DB using the link at the bottom right:

Then open Content Editor and browse to /sitecore/client/Applications/ExperienceAnalytics/Dashboard

You can see that beneath Dashboard are all the report folders (Audience, Behaviour, etc – which are just common Folders) and report pages (Overview, Devices, etc – using template /sitecore/client/Speak/Templates/Pages/Speak-DashboardPage)

Each report page has a PageSettings folder (template = /sitecore/client/Speak/Templates/Pages/PageSettings) that contains an item underneath it for every chart on the page. These items allow you to set the chart title and any other settings such as which metrics / dimensions to use on the chart.

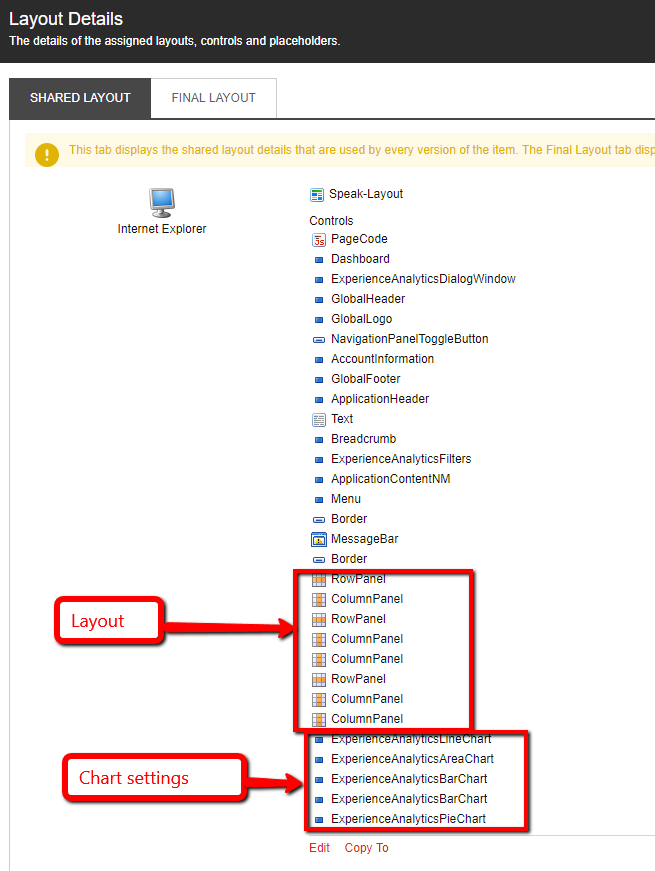
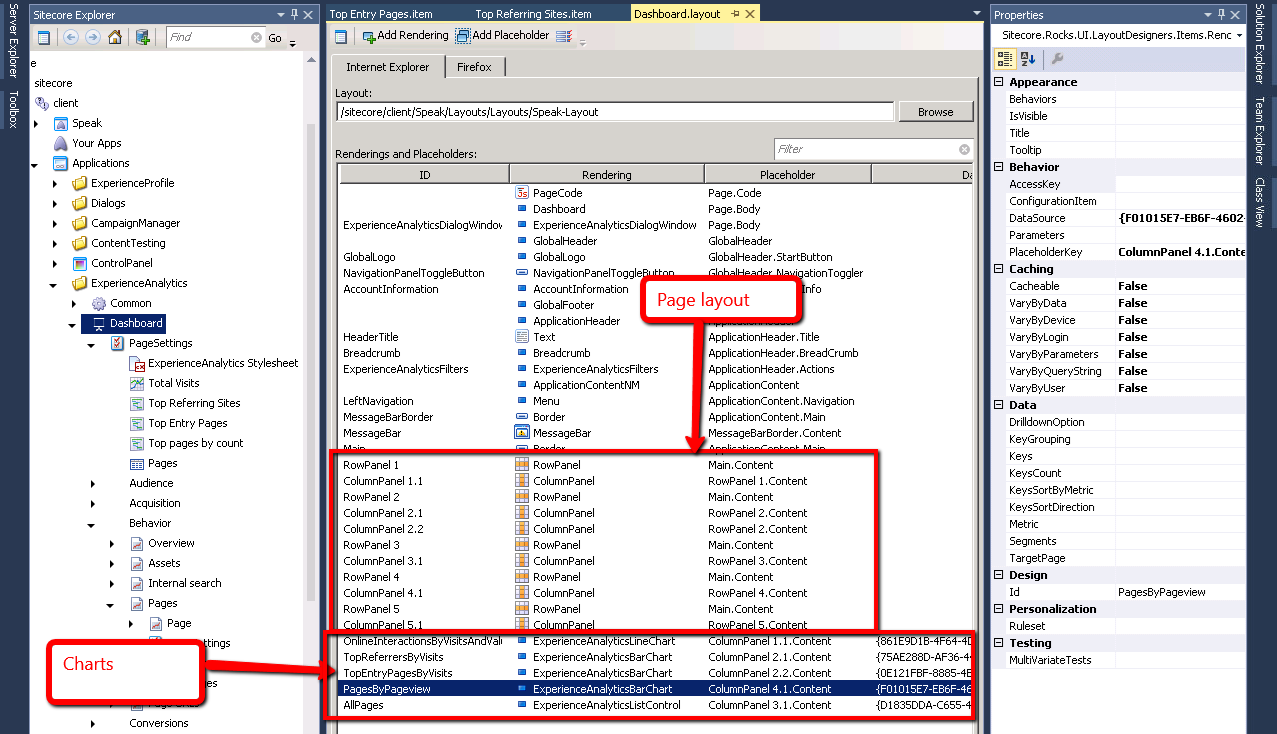
Review the Layout Details for any page with multiple charts and you can see it is made up of a series of Rows and Columns which define the page layout, and renderings for each chart.

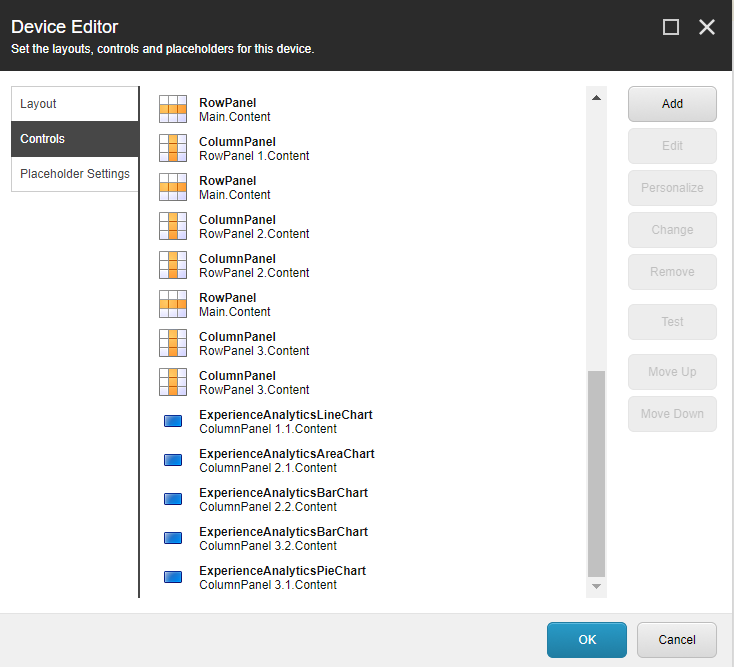
Click Edit and you can see the placeholder IDs used – now you can see how the page is put together. RowPanels are rendered one above the other (in Main.Content placeholder) and each RowPanel automatically defines a placeholder “RowPanel X.Content” where X is the row number. Then ColumnPanels are inserted into the RowPanel placeholders to set up however many columns you want to break that row into. In this example, one full width row, then two 50/50 rows.

The chart renderings themselves are inserted into the ColumnPanels using autogenerated placeholders based on the row and column number e.g. “ColumnPanel 3.2.Content” means this rendering will be shown in row 3 column 2.

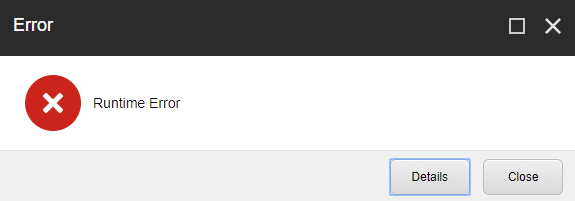
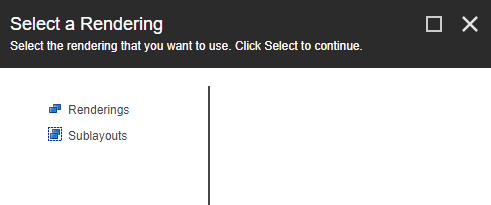
To edit this becomes more interesting because you can’t simply edit this in Sitecore – Edit gives you a server error, and Change gives you an empty list of renderings:

So based on the Sitecore article we have to switch to Sitecore Rocks which is able to edit these. Install and connect to the Sitecore instance, then expand Core database to the same location. Select a report page, Right-click, Tasks, Design Layout:

Now you can edit the configuration of rows/columns by moving/adding/removing RowPanel and ColumnPanels, editing the Placeholder of each. Note that each ColumnPanel has a ‘GridColumns’ field set to 12 for full width, 6 for half width, 4 for 1/3 width, etc. Each RowPanel seems to be used for a single Row, not floating multiple charts into it.

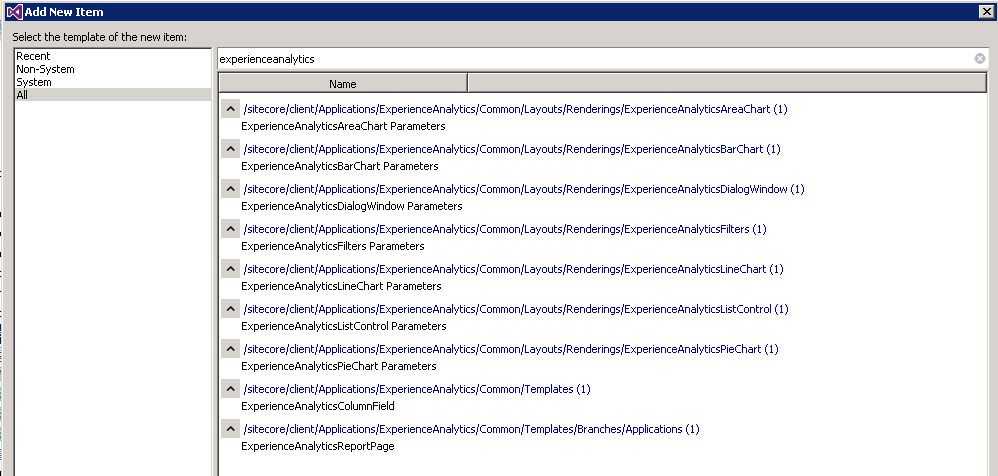
The charts themselves use one of a number of Renderings all starting with ‘ExperienceAnalytics’ – you can copy/paste these using right click options from one page’s layout to another, or Add Rendering to pick one to add from scratch:

Each chart needs to have its Datasource set to a PageSettings child item using the matching parameters template:

Easiest is to find and copy the existing settings item from another report page, under the dashboard page, and then edit the datasource of the chart rendering item to use the new settings item.

Save regularly and reload the dashboard page, to see your changes. Here is my modified dashboard page where I have different charts:

Umbraco setup with media folder on an Azure File Share

We had a client who is moving their legacy Umbraco 4 and 6 sites to Azure VMs, and wanted to use Azure File Share for the shared media folder, rather than the recommended DFS setup.

After some trial and error we got this working (starting from a vanilla Umbraco site), by making sure the following:

  • Create a local Windows user account with the same credentials as the Azure File Share user and password
  • Set the IIS app pool user to the Azure File Store local user  – So Umbraco could access/write to the media folder
  • Set website > authentication > anonymous auth – to use App pool user (not IUSR) – So I could browse to files stored in the media folder
  • Create an IIS ‘Application’ for “media”  (not a virtual directory) – so I can stop the Umbraco web.config from applying to the media folder (see error below)
    • The path should be set to the Azure File Share folder e.g. \\myfilestorage.file.core.windows.net\myfileshare\media (you should map a network drive and create a ‘media’ folder first)
  • Update the web.config and wrap all the Umbraco stuff with <location path=”.” inheritInChildApplications=”false”></location> – to stop the Umbraco web.config from applying to the media folder (see error below)
    • The <configSections> and <runtime> sections must be kept outside of the <location> section.

We have uploaded a bunch of media without error and performed a stress test on the loading of media item via the load balanced front end, without any issues.

We have also checked this works with Umbraco 7 although when we upgrade to this we intend to use Blob storage instead. The Umbraco 7 default web.config includes some <location> sections which must also be moved outside the new <location> tag, and I had to also remove the legacy <httpModules> section to stop some wierd errors…

If you don’t do the last two steps, then it will work in Umbraco but when browsing to a media item you will see this error:

If you forget to set the site authentication to use App Pool Identity, then you will instead get a wierd error code 414 to do with the request URL being too long!


Using environment variables for configuration with VSTS build and release

29/09/17 – Updated to cover new build/release editor. Screenshots still show the old editor. Also sorry about the double quotes in the code snippets, they are being replaced with pretty ones and you have to use normal ones, I’ll sort it out sometime.

We are using Visual Studio Team Services online for source code, task and release management.

For build and deployment we typically create multiple configurations in the project for each environment (e.g. DevCMS, DevWWW, etc) and use config transforms to make changes to the config. While it is easy to set up and maintain, there are a few downsides to this:

  • Potentially sensitive configuration settings are checked into source control (passwords, connection strings)
  • A separate build is required for each environment

Azure websites do allow you to override app settings and connection strings at runtime via the portal, but this doesn’t help with other settings or files. Better would be to use environment variables within the release process. VSTS releases allow just this, in the release definition you can set up variables and set them per each environment:

The question is, how to get the variables set here to update your config files at deploy time. One way I have found to do this is as follows.

Step 1. Add Parameters.xml file to the website project.

This file defines the values that need to be updated. This can replace tokens in any text file, xml files have better support using xpath to target attributes/values to replace.

<?xml version=1.0” encoding=utf-8 ?>
<parameters>
  <parameter name=DemoEnv” description=DemoEnv” defaultValue=#{DemoEnv}#” tags=“”>
    <parameterEntry
kind=XmlFile
                    scope=obj\\Release\\Package\\PackageTmp\\Web\.config$
                    match=/configuration/appSettings/add[@key=’DemoEnv’]/@value />
</parameter>
</parameters>

For the defaultValues, set the value to a token that can be replaced during release. In this example I am using the default token format used by the Replace Tokens utility described later.

I have to credit this post from Colins ALM for explaining this, although it is about TFS the first half still applies.

http://colinsalmcorner.com/post/webdeploy-and-release-management–the-proper-way

Note that connection strings are special and the values are replaced with tokens automatically during package creation. The original value is placed into the SetParameters.xml file. So to get your own token in there, you either need to add a config transform and replace your local connection string with a token, or follow the link above and set up a publish profile that defines a connection string token that will be used in the package.

Step 2. Configure the build to generate a web deploy package

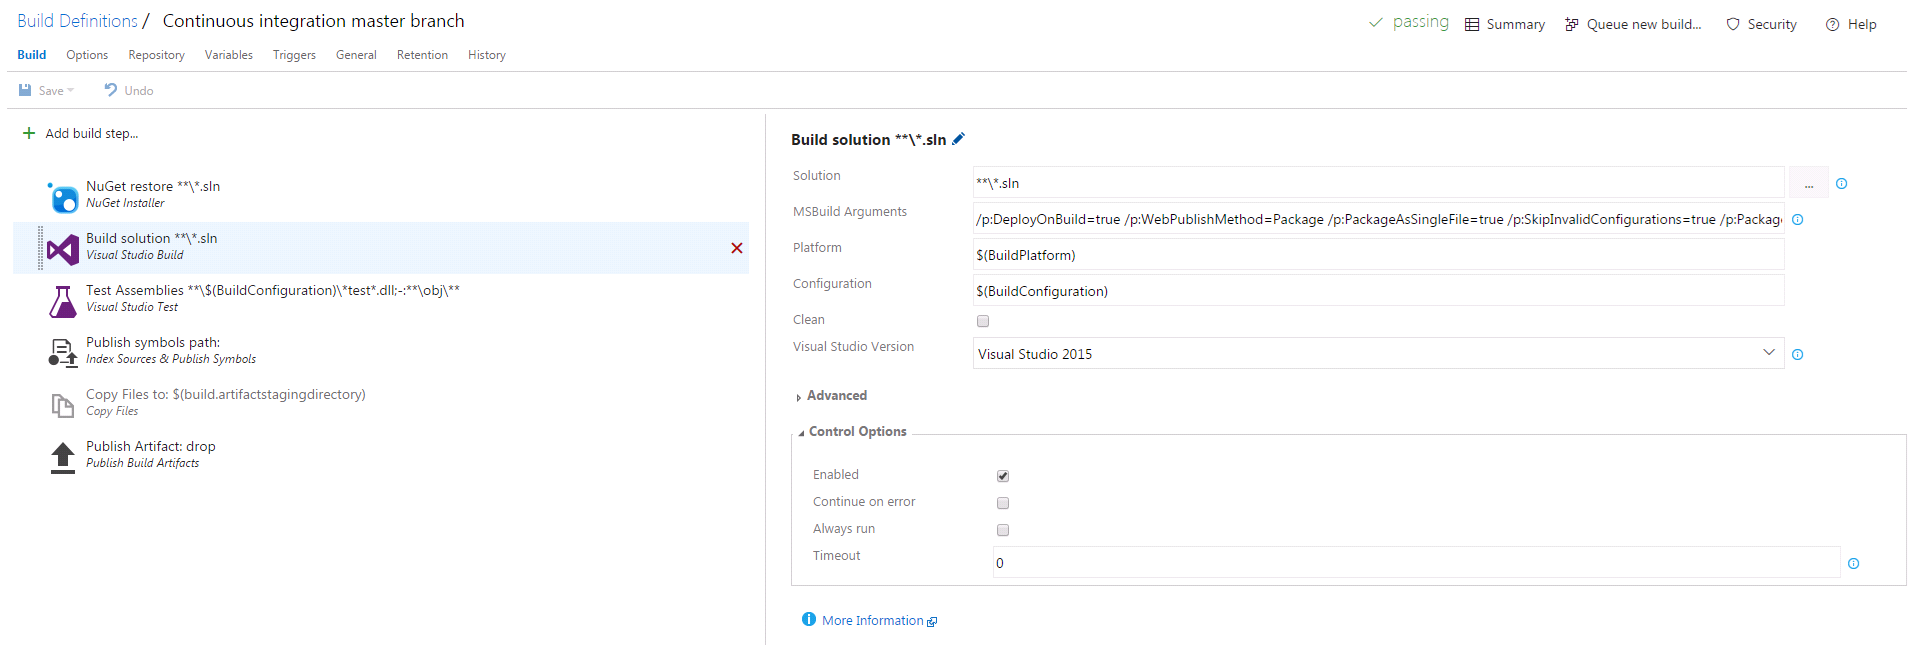
This you can achieve by using a build task with MSBuild arguments as follows:

/p:DeployOnBuild=true /p:WebPublishMethod=Package /p:PackageAsSingleFile=true /p:SkipInvalidConfigurations=true /p:PackageLocation=”$(build.artifactstagingdirectory)\\”

On build it will generate a zip file and a SetParameters.xml file which has just the values from the Parameters.xml that you created earlier:

<?xml version=1.0” encoding=utf-8?>
<parameters>
<setParameter name=DemoEnv” value=#{DemoEnv}# />
</parameters>

This is ideal to replace at release time with a simple token replace task.

Step 3. Set up release definition

In the release definition, add a separate environment for each environment.

Each environment has a list of tasks. First I have added a Replace Tokens task using this add-on from the marketplace.

This is configured to set the root directory to the drop folder from the build, and target files set to the name of the SetParameters.xml file output by the build. The

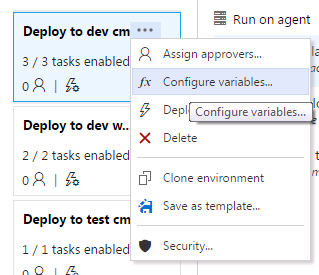
This will replace any variables defined with the values set in the release variables, which you can edit via Configure variables (old editor only):

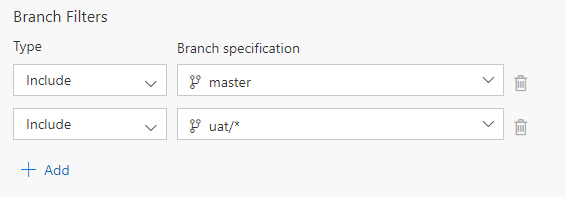
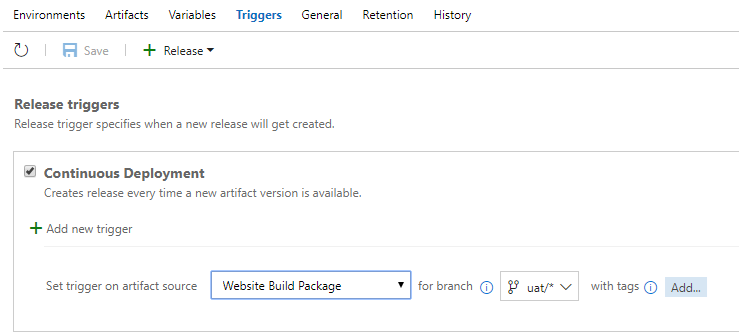
Or on the Variables tab as shown at the top of this post (old and new editor – for old editor, switch using the dropdown at the top right from Release variables to Environment variables).

Step 4. Set up deployment step

The deploy step for us is a normal Azure website deployment which uses web deploy. This defines the subscription, web app, slot, and web deploy package.

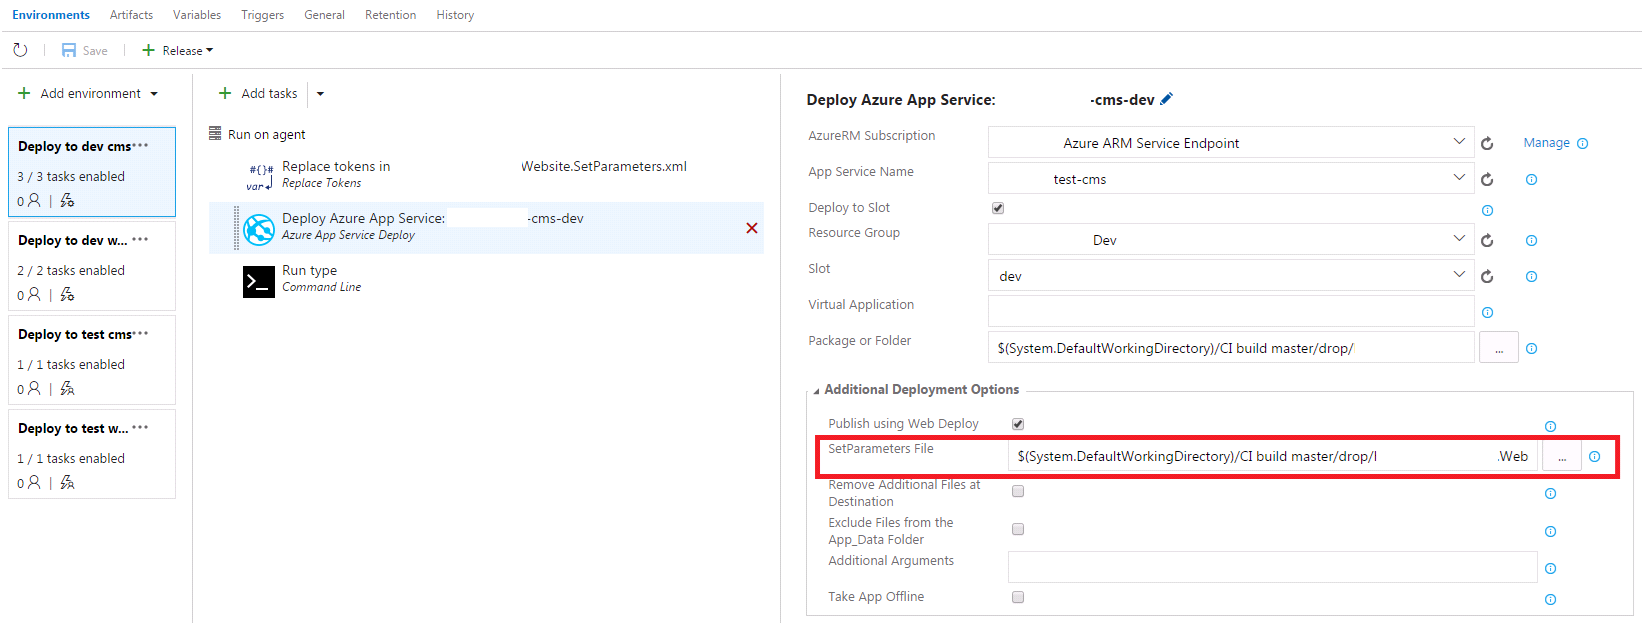
The important thing to set is the SetParameters file additional option which needs to point to the SetParameters.xml file that you did the token replacement on:

NOTE: You have to tick ‘Publish using Web Deploy’ for the SetParameters box to appear.

If you have issues with the token replacement, you can use a command line “Type” command to output the replaced version of the SetParameters.xml file to the release log that you can check has been replaced properly.

References:

http://www.colinsalmcorner.com/post/config-per-environment-vs-tokenization-in-release-management

http://colinsalmcorner.com/post/webdeploy-and-release-management–the-proper-way

One thing to note, I found that if you change the environment variables, and trigger a release, it won’t overwrite the web.config. It requires a new build. I think this is because web deploy uses the file date/size from the package to compare against the site, and this isn’t changing, so it doesn’t replace it. If anyone knows a way around this, let me know!

Download and Combine all Rackspace Cloud Files/CDN access logs

Rackspace Cloud Files / CDN can have access logging enabled on a container, which will log to another container named “.CDN_ACCESS_LOGS” in a folder structure for year/month/date/hour and multiple gzipped log files in each hour folder.

This post gives a bash script to do this but on Windows without a bash interpreter or Python etc I wanted an alternative.

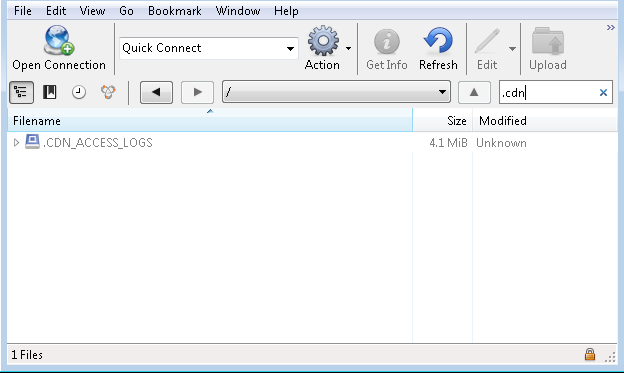
To review these all in one file, use https://cyberduck.io/ to log in to browse the files, using username and API key. Search for .cdn to expose the hidden access logs folder.

081216_0929_Downloadand1.png

Double click to Open it and choose the sub folder you need to review. Right click, Download To, and choose somewhere to save it.

Then you’ll have the folder structure on your machine. Search in the folder for *.gz and select all, move to a single folder so they are all in one place.

Select all .gz files, right click, 7-Zip, Extract to here.

Now you have all the .log files in one folder. Review with your favourite log parsing tool, or to combine into one .log file, open a command prompt to the folder and enter “type *.log > c:\temp\all.log” which will crudely combine them into one file. Not in any order mind.


How to shrink a Sitecore database

We had some databases that were 25 gb each due to some large media items.

To shrink the database, it is not as simple as deleting the large items.

After you have identified and deleted any unnecessary items from Sitecore, do this on each database (or publish the parent section) and then Empty the Sitecore recycle bin (in each database, via the Sitecore Desktop menu).

Then you have to run the Sitecore Clean Up Database wizard. This will remove the orphaned items from the DB. Finally you can shrink the databases and the space will actually be reclaimed.

DLL assembly versioning in TeamCity builds

A nice thing to do when deploying code from a CI server is to embed the build version number into the DLLs, so if someone isn’t sure what code ended up in that environment, they can check the version rather than decompiling the DLL.

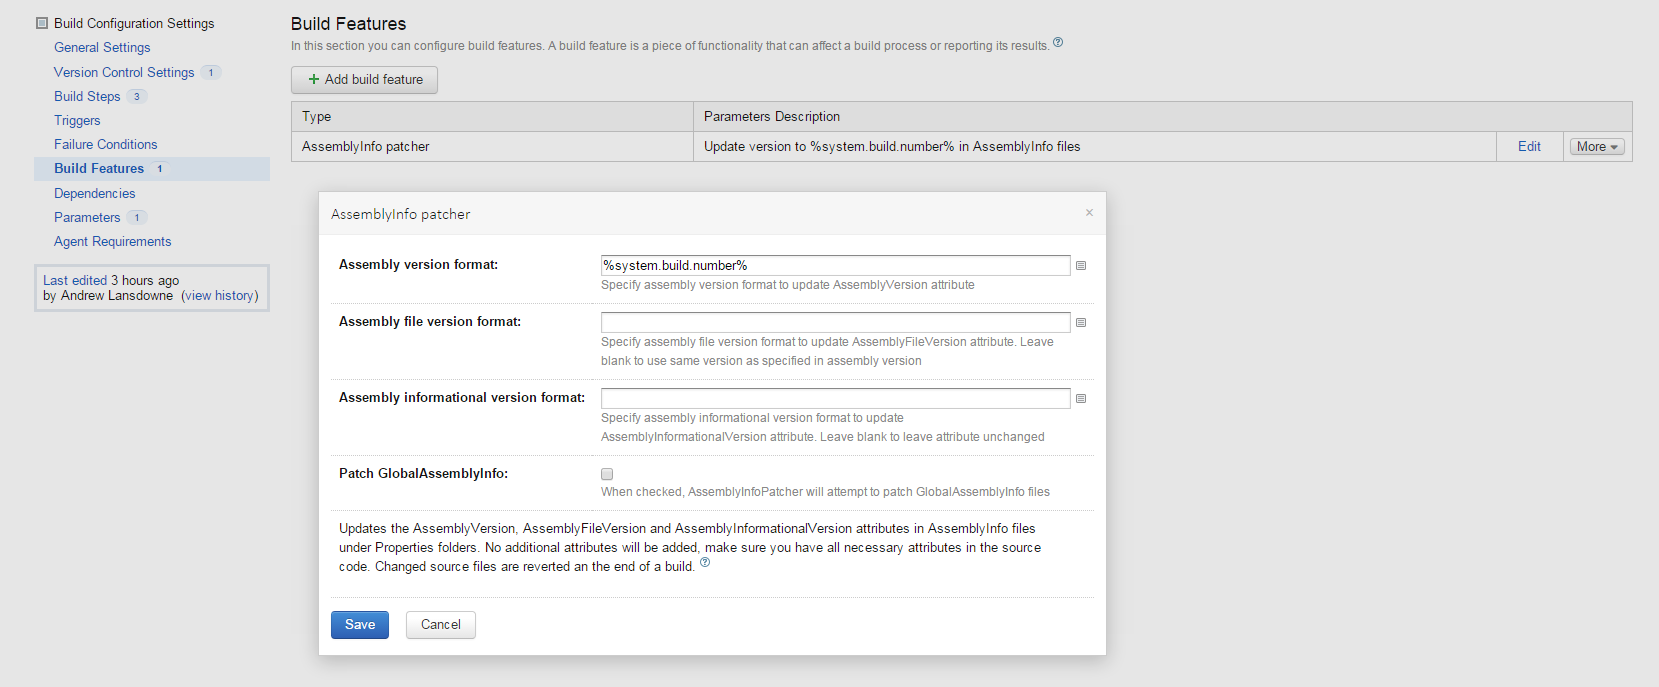
This is very easy in TeamCity, Add the “AssemblyInfo patcher” build feature, with the default configuration:

tc1

Any confusion as to what build is deployed could then check the DLL version against TeamCity, look up that build and check what changes / revision were included.

Some of our clients require us to supply packages which they deploy themselves. We supply web deploy packages. For these we provided numbered releases, and this is particularly useful in this scenario.

For these we also manually set the Build number to include the release number as well as the default build.counter e.g.

tc2

Then the DLL version will be like 5.0.42 which would mean release 5.0 built from TeamCity build# 42.

Alternatively you could embed the vcs revision number.

Capture querystring on New Relic .NET Agent

New Relic by default only captures request URL excluding querystring. This shows on transaction traces and errors etc.

Just spent ages reading the docs to figure out how to get it to include querystring, which is confusingly referred to as Request Parameters (which I thought referred to things such as server variables)

Anyway it is as simple as adding this into the newrelic.config under <configuration> :

<attributes enabled="true">
<include>request.parameters.*</include>
</attributes>

Then all querystring parameters are recorded. I think instead of * you can specify particular named parameters if you need to. Not sure if this captures POST parameters too so be careful not to record sensitive data (maybe don’t do this on an ecommerce site for example).

How to migrate users and passwords between Sitecore instances

If you ever package users from one Sitecore instance to another you will find that upon install the users are disabled and the passwords need to be reset.

What if you were moving them from one version to another and need to keep the same passwords?

Fear not, just run this SQL script. It will update the passwords of all matching usernames to the original passwords, and enable the accounts. The databases must be on the same instance.

/******

 SELECT Upgraded Core DB in SQL Studio.

 In script below, Replace Old_Core with name of old DB

 First run the SELECT only to see what it's going to do, then run the update script.

 ******/
SELECT TOP 1000
      m.[UserId],
      om.userid,
      m.[Password],
      om.password,
      m.[PasswordSalt],
      om.passwordsalt,
      u.username,
     ou.username,
      m.comment,
     m.islockedout,
     om.islockedout,
     m.isapproved,
     om.isapproved
  FROM [aspnet_Membership] m
  inner join [aspnet_Users] u ON m.UserID = u.UserID
  inner join Old_Core.dbo.aspnet_Users ou ON ou.username = u.username
  inner join Old_Core.dbo.aspnet_Membership om ON ou.userid = om.userid

   UPDATE [aspnet_Membership]
  SET
  --comment = ou.username,    -- TEST!
  Password = om.Password,
  PasswordSalt = om.PasswordSalt,
  IsLockedOut = om.IsLockedOut,
  IsApproved = om.IsApproved
  FROM [aspnet_Membership] m
  inner join [aspnet_Users] u ON m.UserID = u.UserID
  inner join Old_Core.dbo.aspnet_Users ou ON ou.username = u.username
  inner join Old_Core.dbo.aspnet_Membership om ON ou.userid = om.userid