Category Archives: Umbraco

Umbraco 8 Forms failing to save error

I had to investigate an odd issue today with Umbraco Forms on v8.18.14 on an Azure Web App, the issue was that when saving a form definition in Umbraco, it appears to save, but upon reload it hadn’t saved at all.

I checked the Umbraco logs and found this error, which I couldn’t find online:

System.FormatException: String was not recognized as a valid DateTime.
   at System.DateTimeParse.Parse(String s, DateTimeFormatInfo dtfi, DateTimeStyles styles)
   at Our.Umbraco.FileSystemProviders.Azure.AzureFileSystem.AddFile(String path, Stream stream, Boolean overrideIfExists)

Firstly I checked that the web config values (Azure app settings) were correct, that is:

  • AzureBlobFileSystem.ContainerName:forms
  • AzureBlobFileSystem.RootUrl:forms
  • AzureBlobFileSystem.ConnectionString:forms

They were. Then I decompiled the Our.Umbraco.FileSystemProviders.Azure.dll to understand what DateTime was failing to Parse.
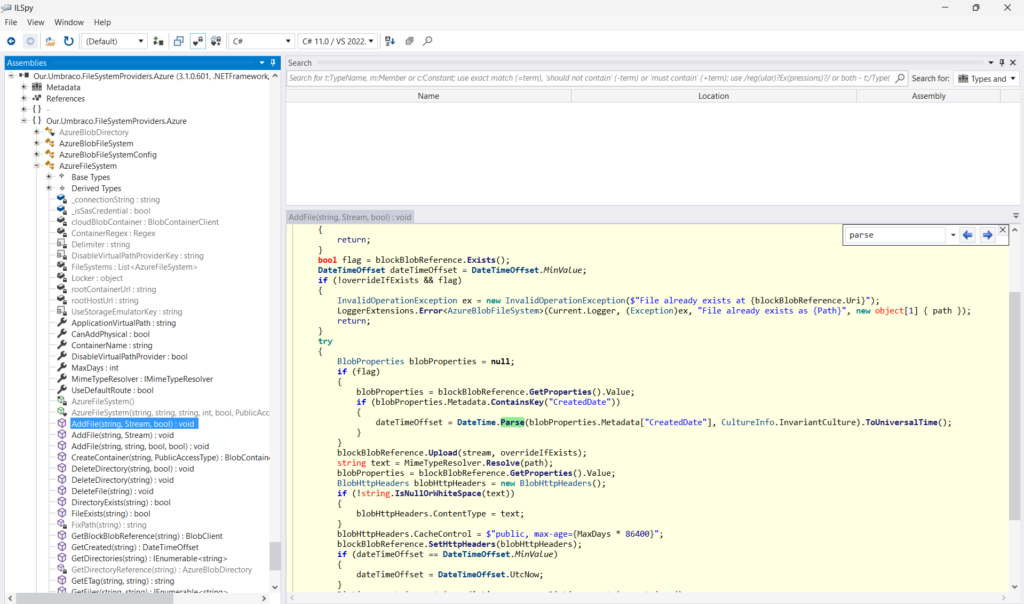
The only call to DateTime.Parse was reading the existing blob metadata “CreatedDate” field.

Using Azure Storage Explorer I found that in some of the blobs under ‘forms’ , the createddate metadata was corrupt and held multiple datetimes, comma-separated.
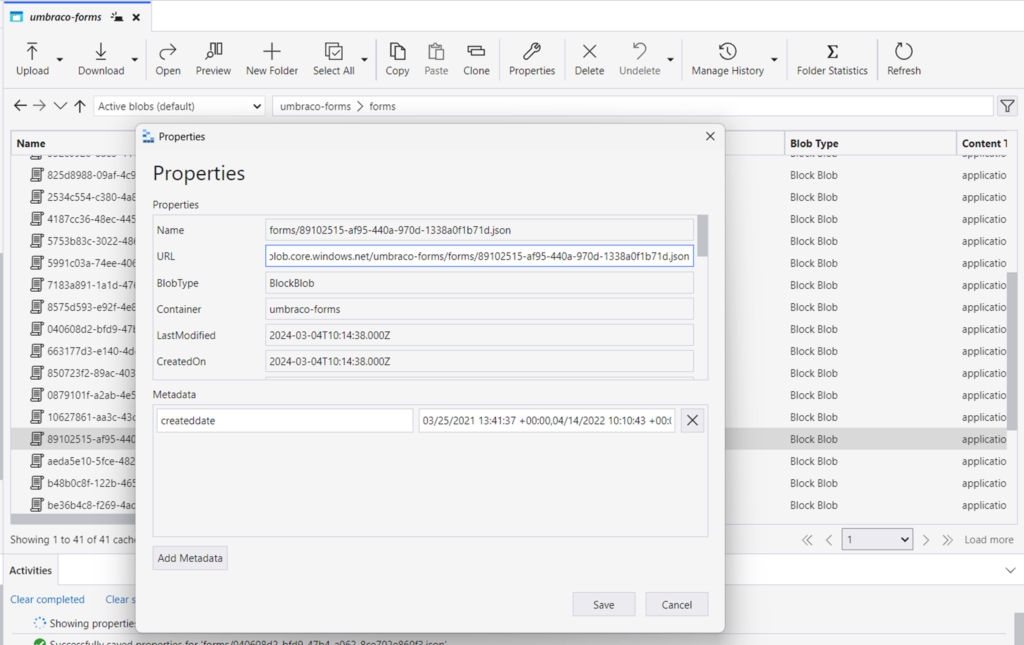
I don’t know how this happened, perhaps it was when the blobs were migrated from one version/environment to another, perhaps a bug in a tool or an old Umbraco version we used to use.

Sure enough, once I manually corrected the field by deleting everything after the first datetime, it works as expected!

Odd, but glad for an easy fix!
How to check and rebuild Examine indexes on each node of an Umbraco Azure Autoscaled web app

If you run your Umbraco 7+ on Azure, and you have split out CM and CD so that /umbraco is not accessible on the CD site (i.e. www) then you may have wondered how to rebuild the Examine indexes if you ever had to. Or even how to check the status.

Of course you could enable Umbraco access on CD but this is not ideal, as it exposes the Umbraco admin interface to the world. Even if you do this temporarily and then change it back there is a risk that you forget and/or break the website in doing so. You could enable it just from your IP address.

Even if you do this, when you go to the Developer > Examine Indexes tab, if your app is scaled up 2+ instances then each time you refresh it will go to a different server and be difficult to tell which server(s) indexes you are looking at / rebuilding.

To help with this I made a quick script that can be dropped into an Umbraco 7 site.

The only thing you also have to do is to add its URL into the umbracoReservedUrls setting in web.config.

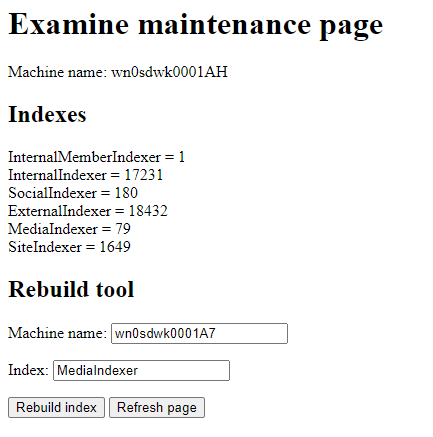
It is very basic and ugly, but it shows you the important information – – which server you are looking at, and the state of the indexes (how many documents).

You can compare this against the expected state of each index from the CMS (where you can reliably rebuilt the indexes through the backoffice first to ensure they are complete).

If any index is incomplete on one or more nodes, the tool lets you rebuild it by specifying the machine and index name and then press Rebuild. In case the next request goes to one of the other nodes, there is a warning and you can click Rebuild again until your request goes to the correct node. Then just refresh a few times until you see that the index count on the given node is what you expect.

This simple tool allowed me to rebuild a corrupt index and more importantly be confident that the index state on all the active nodes is the same and complete.

The code can be found here, just save the .aspx file into the website (add it to umbracoReservedUrls if needed).

Have only tested this on v7.6.4 (and I know, I need to upgrade, which will probably solve the indexing problems!) it should at least work on newer v7 and possibly newer versions.

Umbraco setup with media folder on an Azure File Share

We had a client who is moving their legacy Umbraco 4 and 6 sites to Azure VMs, and wanted to use Azure File Share for the shared media folder, rather than the recommended DFS setup.

After some trial and error we got this working (starting from a vanilla Umbraco site), by making sure the following:

  • Create a local Windows user account with the same credentials as the Azure File Share user and password
  • Set the IIS app pool user to the Azure File Store local user  – So Umbraco could access/write to the media folder
  • Set website > authentication > anonymous auth – to use App pool user (not IUSR) – So I could browse to files stored in the media folder
  • Create an IIS ‘Application’ for “media”  (not a virtual directory) – so I can stop the Umbraco web.config from applying to the media folder (see error below)
    • The path should be set to the Azure File Share folder e.g. \\myfilestorage.file.core.windows.net\myfileshare\media (you should map a network drive and create a ‘media’ folder first)
  • Update the web.config and wrap all the Umbraco stuff with <location path=”.” inheritInChildApplications=”false”></location> – to stop the Umbraco web.config from applying to the media folder (see error below)
    • The <configSections> and <runtime> sections must be kept outside of the <location> section.

We have uploaded a bunch of media without error and performed a stress test on the loading of media item via the load balanced front end, without any issues.

We have also checked this works with Umbraco 7 although when we upgrade to this we intend to use Blob storage instead. The Umbraco 7 default web.config includes some <location> sections which must also be moved outside the new <location> tag, and I had to also remove the legacy <httpModules> section to stop some wierd errors…

If you don’t do the last two steps, then it will work in Umbraco but when browsing to a media item you will see this error:

If you forget to set the site authentication to use App Pool Identity, then you will instead get a wierd error code 414 to do with the request URL being too long!


Automated Site Setup Scripts (Sitecore / Umbraco)

We wanted a simple way to get a new environment set up on a developer machine, but without the hassle of Virtual Machines.

Enter, Microsoft’s appcmd.

This lets you manipulate IIS7 via command line calls. There is lots of documentation on the IIS site but it takes a while to figure out which commands you need to do everything to set up a site. So I’ve put together a selection of the useful commands below in a sample site setup script.

We save these as batch files (.bat) and put them in a shared folder.

Prerequisites:

  • You work on Windows using IIS7
  • (if Sitecore) You have all relevant Sitecore installation zips in a shared network folder
  • (if Umbraco) You use Nuget package to distribute Umbraco CMS (or you could do the zip thing)
  • You run sites locally with custom host name, using a shared DB
  • All team members setup sites in the same folder path e.g. c:\work
  • You have admin rights on the local machine

Sample setup script:

Put this in a .bat file and save in a shared folder. Keep as many steps as required, and replace the relevant placeholders. To run, right click Run as Administrator.

@ECHO OFF

ECHO *** MUST BE RUN AS ADMIN - IF NOT PLEASE CLOSE AND RUN AGAIN, OTHERWISE: ***
PAUSE

ECHO *** CHECKING OUT FROM SVN ***

IF not exist c:\PATH_TO_TRUNK svn checkout -q https://SVN_PATH_TO_TRUNK c:\PATH_TO_TRUNK

ECHO *** EXTRACTING SITECORE ***

"C:\Program Files\7-Zip\7z" x -y "PATH_TO_SITECORE_ZIPS\Sitecore 7.0 rev. 140120.zip" -oc:\PATH_TO_TRUNK "Sitecore 7.0 rev. 140120\Data" "Sitecore 7.0 rev. 140120\Website"

ECHO *** RENAMING SITECORE ***

rename "c:\PATH_TO_TRUNK\Sitecore 7.0 rev. 140120" www

ECHO *** COPY LICENSE ***

copy PATH_TO_LICENSE\license.xml c:\PATH_TO_TRUNK\www\Data

ECHO *** CREATING APP POOL ***

C:\Windows\System32\inetsrv\appcmd add apppool /name:"APP_POOL_NAME" -managedRuntimeVersion:v4.0

ECHO *** CREATING SITE ***

C:\Windows\System32\inetsrv\appcmd add site /name:"APP_POOL_NAME" /bindings:http://site.localhost:80 /physicalPath:"c:\PATH_TO_TRUNK\www\Website" -applicationDefaults.applicationPool:APP_POOL_NAME

ECHO *** CREATING VIRTUAL DIRECTORIES ***

C:\Windows\System32\inetsrv\appcmd add vdir /app.name:"APP_POOL_NAME/" /path:/siteAssets /physicalPath:c:\PATH_TO_TRUNK\siteAssets

ECHO *** ADDING TO HOSTS FILE ***

find /c "	site.localhost" c:\windows\system32\drivers\etc\hosts
if %errorlevel% equ 1 goto notfound
echo Already there
goto done
:notfound
ECHO 127.0.0.1	site.localhost >> c:\windows\system32\drivers\etc\hosts
goto done
:done
  
ECHO *** BUILDING SOLUTION ***

C:\Windows\Microsoft.NET\Framework\v4.0.30319\MSBuild.exe c:\PATH_TO_TRUNK\src\Site.sln /verbosity:quiet

ECHO *** OPENING SITE ***

start http://site.localhost/

PAUSE

Hope that’s helpful to someone!

Umbraco 7.2.1 Error when deployed via Web Deploy

When deploying latest Umbraco 7.2.1 to a test server via Web Deploy (through TeamCity) I got this error:

  • Could not load file or assembly ‘System.Web.Http, Version=4.0.0.0, Culture=neutral, PublicKeyToken=31bf3856ad364e35’ or one of its dependencies. The system cannot find the file specified.

Turns out the following DLLs weren’t being deployed to the bin folder (these were part of various nuget packages as I installed the Umbraco nuget package):

  • System.Web.Http.dll
  • System.Web.Http.WebHost.dll
  • System.Net.Http.Formatting.dll

The fix for this was to find the reference in the website project and set copy local False then True. It’s missing a <private>True</private> flag in the project file.

If you get an issue like this I suggest you compare the bin folder vs your local site and see if anything’s missing.

Also while sorting this out I found an umbraco recommendation to upgrade to the latest version of MVC4 by running this command in the package console:

  • Update-Package Microsoft.AspNet.Mvc -Version 4.0.40804

Worth doing as well. After this I also had to set copy local False/True on System.Web.Mvc to get the latest MVC dll to copy in.