Introduction
Our QA team have started creating Selenium scripts to automate browser functional testing. These allow us to automatically run through a set of actions on a website and flag up any issues.
Running Scripts Manually
You will need:
- Firefox (latest)
- Selenium IDE (Firefox add-on available through Firefox or http://docs.seleniumhq.org/download/)
To create/open/run a script:
- Open Firefox
- Open Selenium (should be button on toolbar otherwise ctrl+alt+s or alt, Tools, Selenium IDE)
- Follow selenium documentation to record/playback scripts
Automating Scripts via Unit Tests
We can convert the scripts into C# unit tests and run them via TeamCity. This explains how to set this up. You will need:
- First follow the above to create the test suite you wish to convert and ensure you can run scripts manually
- Download Selenium Server from http://www.seleniumhq.org/download/ and store the .jar somewhere you can run it from.
-
Run Selenium Server using Java (put this in a .bat file next to the .jar file and double click it:
- “C:\Program Files\Java\jdk1.8.0_20\bin\java” -jar selenium-server-standalone-2.43.1.jar
- Visual Studio 2013
- Install NUnit from http://www.nunit.org/
- NUnit Test Adapter (extension for VS 2013)
- A .NET solution open to add the unit tests into
First prepare the solution for selenium unit tests:
- Add a new project (C# Class Library) suggest something like SiteName.SeleniumTests
-
Right click the new project, Manage Nuget Packages, install the following:
- NUnit
- Selenium Remote Control (RC)
- Create a folder in which to place the unit tests (e.g. grouped like NewUserTests or just Tests)
- In Selenium IDE, choose File, Batch convert test cases, C#/Nunit/Remote Control
- Select your Tests folder as the destination folder
- Select all the test cases you wish to convert (html files) and they should be saved as C# files in the Tests folder
- In Visual Studio, show existing files, and Include in project all the generated .cs files
- Build (fix any compilation errors)
- Open Test > Windows > Test Explorer, this should show your tests (if not, rebuild)
- Close all Firefox windows (they can interfere with Selenium Server)
- Click Run All. Selenium Server should log the commands and launch Firefox to run the test.
To capture screenshots at the end of each test:
- Create a Screenshots folder in your unit test project
-
In each .cs file, in Teardown method add the following line of code before selenium.Stop():
- selenium.CaptureEntirePageScreenshot(System.IO.Path.Combine(System.Environment.CurrentDirectory, @”..\..\Screenshots\” + this.GetType().Name + “.png”), “”);
- Run the test, screenshot should be saved into the Screenshots folder with same name as the test class.
Integration with TeamCity
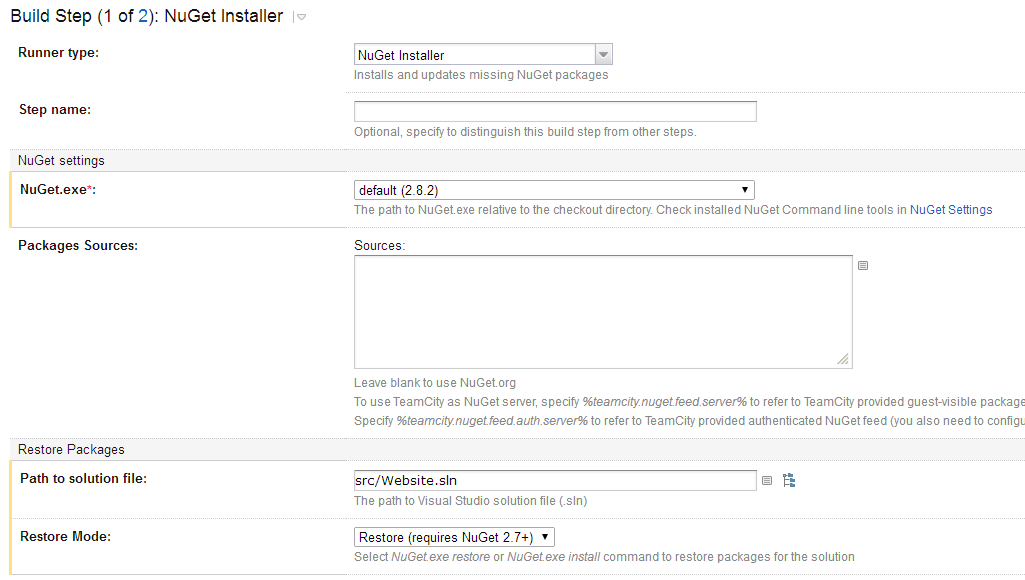
To integrate into TeamCity, set up a build configuration to run the NUnit test with the following build steps:
- Compile selenium tests – Msbuild runner, point at Selenium.csproj file
- Run selenium tests – Nunit runner, run tests from (path to compiled DLL)
Set the Artifact paths setting on the build settings to point to the Screenshots folder to save the screenshots after each run.
To run via TeamCity the Selenium server must be running. You could start this manually same as above, hopefully this can be made to run automatically as a service but I’m not sure how.
Gotchas
Each test must be independent of any other as they may be run in any order, or perhaps only failed tests might be run. Also the server will restart the browser between each test so they can’t depend on the final state of the previous script (like they can in the IDE).
We’re going to try using New Relic Synthetics which has a feature for test automation – apparently you can upload a Selenium script and it can automatically run as and when, we have yet to try this out though!