Sitecore 8 Federated Experience Manager

I recently posted a short introduction to the Sitecore FXM on the e3 blog, below is a more detailed version!

One new feature in Sitecore 8 is the Federated Experience Manager (FXM). This is a brand new tool designed to allow you to apply Sitecore’s marketing features to existing non-Sitecore sites. This would be ideal for clients who are investing in the Sitecore platform but also have legacy sites which aren’t being redeveloped into Sitecore. For example, associated WordPress blogs, Drupal communities, even flat microsites could contribute to a user’s Sitecore Experience profile and affect personalisation across all these sites. I’ve had a chance to experiment with this tool and this is what I found.

This new tool is an option in the new Sitecore Launchpad. It presents you with a list of sites that you have added already, along with number of visits that have been tracked through the FXM:

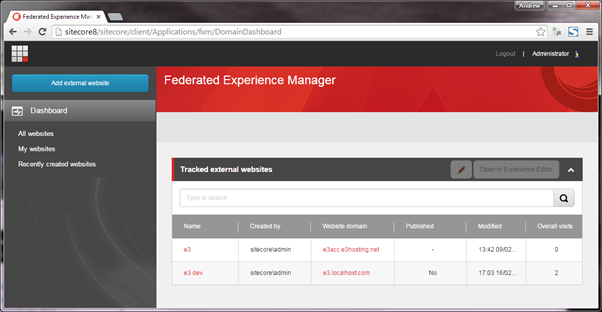
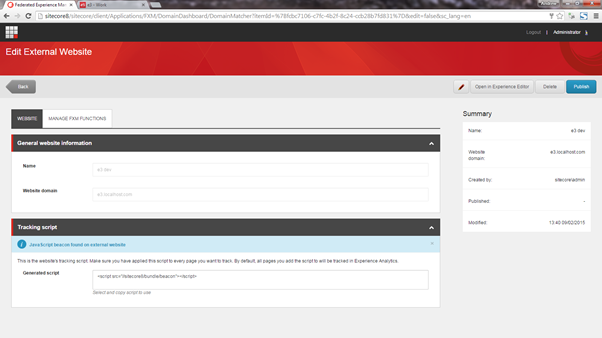
After creating a federated site they show in this list. For testing purposes I have added the e3 test website as a federated site. You need to enter the site’s domain and then paste some tracking script onto every page of the target site. The details of my federated site are as follows:

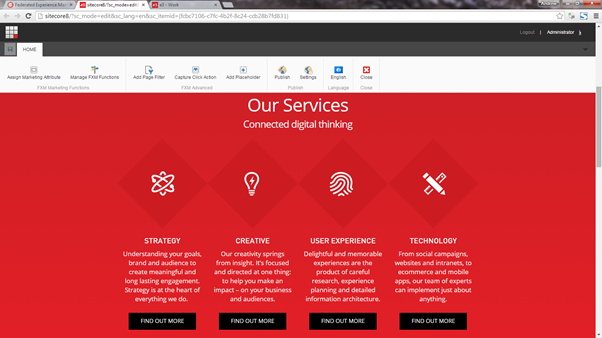
Now comes the fun bit. Clicking on “Open in Experience Editor” brings up a new version of the Experience Editor, geared towards being able to edit federated sites. In my instance, here you can see the e3 homepage showing up within the experience editor of my fresh Sitecore 8 instance:

From this visual editor you are able to do various things such as:

  • Attach Sitecore functionality to links / button clicks (such as triggering a goal)
  • Assign goals/campaigns/events to trigger when certain page(s) are viewed
  • Add Sitecore placeholders at any point within the existing site, to inject new content or replace existing content

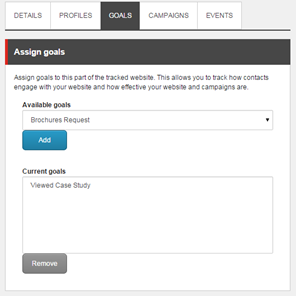
As a basic example, we could trigger a goal when a user views a case study and then display a personalised block on the homepage to highlight a particular case study, such as this one about Unicef Launchpad.

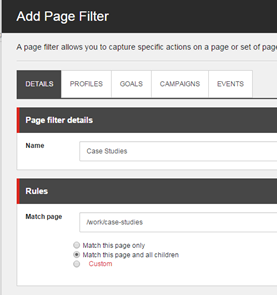
The first thing you must do is add a Page Filter. This is how Sitecore will target your personalisation to decide which page(s) it affects. Here we create a filter to match all case study pages, and assign a custom “Viewed Case Study” goal I made earlier:


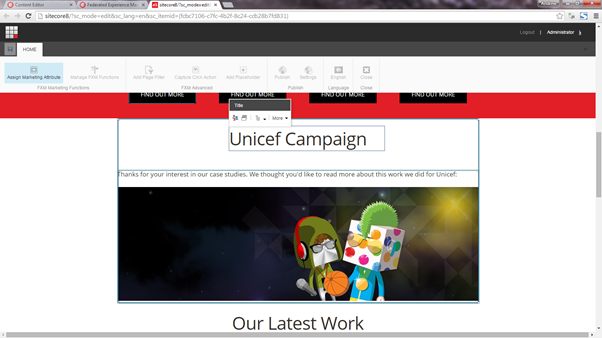
Next, for the personalisation on the Homepage, I can click “Add Placeholder” and then click on a part of the page. This selects the component I have clicked and gives a choice of adding before or after that component:

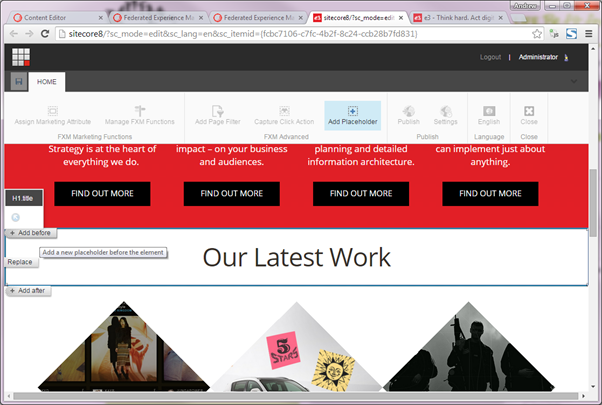
In this case I have chosen “Add before” as I want to add a new component in above “Our Latest Work”. Once the placeholder is added, I can add any existing Sitecore layout in the new placeholder (for example any design component you already have built for your Sitecore site), and display the desired content. The federated site may need updated CSS to correctly display design elements from the Sitecore site, otherwise they might appear unstyled. Once I’ve finished adding the new component it looks like this:

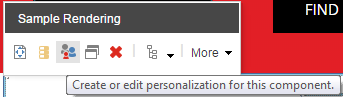
By default this new content will display all the time. The final step is to apply some personalisation to the new block. To do this, I can select the block and choose Edit personalisation from the floating toolbar:

The following personalisation settings will show the custom content if the user has viewed a case study, otherwise hide the component. You could add multiple conditions in here to display different content depending on the user’s activity.

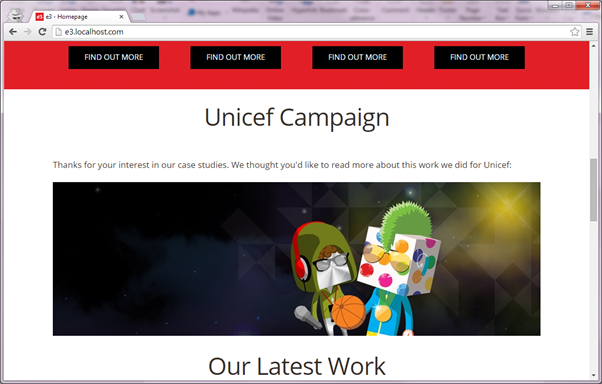
Once all this is done and published, I can browse to the target site and it appears as normal. If I browse to any case study and then back to the homepage, I can see the new component has been injected into the page’s content:

There are many possibilities in terms of the personalisation logic you could apply, and this new ability to apply marketing features to external sites really adds a new dimension to Sitecore’s experience platform.

Automated Site Setup Scripts (Sitecore / Umbraco)

We wanted a simple way to get a new environment set up on a developer machine, but without the hassle of Virtual Machines.

Enter, Microsoft’s appcmd.

This lets you manipulate IIS7 via command line calls. There is lots of documentation on the IIS site but it takes a while to figure out which commands you need to do everything to set up a site. So I’ve put together a selection of the useful commands below in a sample site setup script.

We save these as batch files (.bat) and put them in a shared folder.

Prerequisites:

  • You work on Windows using IIS7
  • (if Sitecore) You have all relevant Sitecore installation zips in a shared network folder
  • (if Umbraco) You use Nuget package to distribute Umbraco CMS (or you could do the zip thing)
  • You run sites locally with custom host name, using a shared DB
  • All team members setup sites in the same folder path e.g. c:\work
  • You have admin rights on the local machine

Sample setup script:

Put this in a .bat file and save in a shared folder. Keep as many steps as required, and replace the relevant placeholders. To run, right click Run as Administrator.

@ECHO OFF

ECHO *** MUST BE RUN AS ADMIN - IF NOT PLEASE CLOSE AND RUN AGAIN, OTHERWISE: ***
PAUSE

ECHO *** CHECKING OUT FROM SVN ***

IF not exist c:\PATH_TO_TRUNK svn checkout -q https://SVN_PATH_TO_TRUNK c:\PATH_TO_TRUNK

ECHO *** EXTRACTING SITECORE ***

"C:\Program Files\7-Zip\7z" x -y "PATH_TO_SITECORE_ZIPS\Sitecore 7.0 rev. 140120.zip" -oc:\PATH_TO_TRUNK "Sitecore 7.0 rev. 140120\Data" "Sitecore 7.0 rev. 140120\Website"

ECHO *** RENAMING SITECORE ***

rename "c:\PATH_TO_TRUNK\Sitecore 7.0 rev. 140120" www

ECHO *** COPY LICENSE ***

copy PATH_TO_LICENSE\license.xml c:\PATH_TO_TRUNK\www\Data

ECHO *** CREATING APP POOL ***

C:\Windows\System32\inetsrv\appcmd add apppool /name:"APP_POOL_NAME" -managedRuntimeVersion:v4.0

ECHO *** CREATING SITE ***

C:\Windows\System32\inetsrv\appcmd add site /name:"APP_POOL_NAME" /bindings:http://site.localhost:80 /physicalPath:"c:\PATH_TO_TRUNK\www\Website" -applicationDefaults.applicationPool:APP_POOL_NAME

ECHO *** CREATING VIRTUAL DIRECTORIES ***

C:\Windows\System32\inetsrv\appcmd add vdir /app.name:"APP_POOL_NAME/" /path:/siteAssets /physicalPath:c:\PATH_TO_TRUNK\siteAssets

ECHO *** ADDING TO HOSTS FILE ***

find /c "	site.localhost" c:\windows\system32\drivers\etc\hosts
if %errorlevel% equ 1 goto notfound
echo Already there
goto done
:notfound
ECHO 127.0.0.1	site.localhost >> c:\windows\system32\drivers\etc\hosts
goto done
:done
  
ECHO *** BUILDING SOLUTION ***

C:\Windows\Microsoft.NET\Framework\v4.0.30319\MSBuild.exe c:\PATH_TO_TRUNK\src\Site.sln /verbosity:quiet

ECHO *** OPENING SITE ***

start http://site.localhost/

PAUSE

Hope that’s helpful to someone!

Selenium Automated Testing using C# and TeamCity

Introduction

Our QA team have started creating Selenium scripts to automate browser functional testing. These allow us to automatically run through a set of actions on a website and flag up any issues.

Running Scripts Manually

You will need:

To create/open/run a script:

  1. Open Firefox
  2. Open Selenium (should be button on toolbar otherwise ctrl+alt+s or alt, Tools, Selenium IDE)
  3. Follow selenium documentation to record/playback scripts

Automating Scripts via Unit Tests

We can convert the scripts into C# unit tests and run them via TeamCity. This explains how to set this up. You will need:

  • First follow the above to create the test suite you wish to convert and ensure you can run scripts manually
  • Download Selenium Server from http://www.seleniumhq.org/download/ and store the .jar somewhere you can run it from. 
  • Run Selenium Server using Java (put this in a .bat file next to the .jar file and double click it:
    • “C:\Program Files\Java\jdk1.8.0_20\bin\java” -jar selenium-server-standalone-2.43.1.jar
  • Visual Studio 2013
  • Install NUnit from http://www.nunit.org/
  • NUnit Test Adapter (extension for VS 2013)
  • A .NET solution open to add the unit tests into

First prepare the solution for selenium unit tests:

  1. Add a new project (C# Class Library) suggest something like SiteName.SeleniumTests
  2. Right click the new project, Manage Nuget Packages, install the following:
    1. NUnit
    2. Selenium Remote Control (RC)
  3. Create a folder in which to place the unit tests (e.g. grouped like NewUserTests or just Tests)
  4. In Selenium IDE, choose File, Batch convert test cases, C#/Nunit/Remote Control
  5. Select your Tests folder as the destination folder
  6. Select all the test cases you wish to convert (html files) and they should be saved as C# files in the Tests folder
  7. In Visual Studio, show existing files, and Include in project all the generated .cs files
  8. Build (fix any compilation errors)
  9. Open Test > Windows > Test Explorer, this should show your tests (if not, rebuild)
  10. Close all Firefox windows (they can interfere with Selenium Server)
  11. Click Run All. Selenium Server should log the commands and launch Firefox to run the test.

To capture screenshots at the end of each test:

  1. Create a Screenshots folder in your unit test project
  2. In each .cs file, in Teardown method add the following line of code before selenium.Stop():
    1. selenium.CaptureEntirePageScreenshot(System.IO.Path.Combine(System.Environment.CurrentDirectory, @”..\..\Screenshots\” + this.GetType().Name + “.png”), “”);
  3. Run the test, screenshot should be saved into the Screenshots folder with same name as the test class.

Integration with TeamCity

To integrate into TeamCity, set up a build configuration to run the NUnit test with the following build steps:

  1. Compile selenium tests – Msbuild runner, point at Selenium.csproj file
  2. Run selenium tests – Nunit runner, run tests from (path to compiled DLL)

Set the Artifact paths setting on the build settings to point to the Screenshots folder to save the screenshots after each run.

To run via TeamCity the Selenium server must be running. You could start this manually same as above, hopefully this can be made to run automatically as a service but I’m not sure how.

Gotchas

Each test must be independent of any other as they may be run in any order, or perhaps only failed tests might be run. Also the server will restart the browser between each test so they can’t depend on the final state of the previous script (like they can in the IDE).

We’re going to try using New Relic Synthetics which has a feature for test automation – apparently you can upload a Selenium script and it can automatically run as and when, we have yet to try this out though!

Umbraco 7.2.1 Error when deployed via Web Deploy

When deploying latest Umbraco 7.2.1 to a test server via Web Deploy (through TeamCity) I got this error:

  • Could not load file or assembly ‘System.Web.Http, Version=4.0.0.0, Culture=neutral, PublicKeyToken=31bf3856ad364e35’ or one of its dependencies. The system cannot find the file specified.

Turns out the following DLLs weren’t being deployed to the bin folder (these were part of various nuget packages as I installed the Umbraco nuget package):

  • System.Web.Http.dll
  • System.Web.Http.WebHost.dll
  • System.Net.Http.Formatting.dll

The fix for this was to find the reference in the website project and set copy local False then True. It’s missing a <private>True</private> flag in the project file.

If you get an issue like this I suggest you compare the bin folder vs your local site and see if anything’s missing.

Also while sorting this out I found an umbraco recommendation to upgrade to the latest version of MVC4 by running this command in the package console:

  • Update-Package Microsoft.AspNet.Mvc -Version 4.0.40804

Worth doing as well. After this I also had to set copy local False/True on System.Web.Mvc to get the latest MVC dll to copy in.

Respond to address selected JavaScript event with PostcodeAnywhere Capture+

Capture+ allows you to pop some code in your page and configure a JavaScript-driven address finder through your browser.

We wanted to hide the address fields until you select the address from the postcode lookup.

It doesn’t appear to let you customise the JavaScript in any way to allow this, however a query to their support turned up that you can respond to the event when a user selects an address with the following JavaScript:

<script type="text/javascript">
    capturePlus.listen("load", function(control) {
        //custom code
        control.listen("populate", function(address) {
            console.log("User selected: " + address.PostalCode);
			        });
    });
</script>

As this isn’t documented anywhere on their site I thought I would post it in case anyone else needs to know how to do this!

UPDATE: Actually it is documented at the end of http://www.postcodeanywhere.co.uk/support/articles/article/getting-started-with-captureplus

Restore NuGet Packages for Solution using TeamCity

So you’ve used NuGet packages into your solution and not checked in the packages folder to source control. Visual Studio will download the packages upon build, but TeamCity will not and you will end up with a build error such as:

This project references NuGet package(s) that are missing on this computer. Enable NuGet Package Restore to download them. For more information, see http://go.microsoft.com/fwlink/?LinkID=322105. The missing file is ..\packages\UmbracoCms.7.1.4\build\UmbracoCms.props.

But, how to enable NuGet Package Restore on TeamCity?

UPDATE: It seems this is as easy as in Visual Studio, right click the solution and Enable Nuget Package Restore for Solution. I’m sure I tried this before and it didn’t work, but it seems to now!

It’s quite easy. Just add a NuGet Installer build step (make sure to order it before the project build step):


All I specified is the NuGet version, path to solution file and Restore mode.

The first time you do this no default NuGet version will exist so you have to click NuGet Settings link and Fetch the latest version of NuGet.

Note that after this your build agents will disconnect to install the NuGet version.

Then your build should succeed! Awesome!

How to hide the Set associated content button in Sitecore

Sitecore Page Editor provides a Set associated content button in the floating toolbar around each component:

set-associated-content

This allows you to set the Data source for the component.

The selection can be restricted by Template or Location (in the Sitecore tree) by setting the page editor options on the component:

page-editor-options

If you have some components that require a data source and others that do not, it can be confusing for editors because the Set associated content button is always visible. The only way to see if it is intended to be used in a particular instance is by clicking it and seeing whether the developer has set the restrictions – if not then it allows you to pick any item from the whole site tree and you realise you probably aren’t meant to use it.

I thought it would be nice to only show the button if the Template restriction has been set, so the editor doesn’t try to use it when it isn’t intended.

To do this, I created a custom class to replace the built-in SetDatasource command:

using Sitecore.Data.Items;
using Sitecore.Shell.Applications.WebEdit.Commands;
using Sitecore.Shell.Framework.Commands;
using System;
using System.Collections.Generic;
using System.Linq;
using System.Text;
using System.Threading.Tasks;

namespace Training.Utilities.BaseCore.Commands
{
    public class SetDatasourceIfTemplateSet : SetDatasource
    {
        public override CommandState QueryState(CommandContext context)
        {
            Sitecore.Data.ID renderingId;
            if (Sitecore.Data.ID.TryParse(context.Parameters["renderingId"], out renderingId))
            {
                Item renderingItem = Sitecore.Context.Database.GetItem(renderingId);
                if (string.IsNullOrEmpty(renderingItem["Datasource Template"]))
                {
                    return CommandState.Hidden;
                }
            }
            return base.QueryState(context);
        }
    }
}

Then in the /App_Config/Commands.config file, replace the webedit:setdatasource command type with our custom version:

<command name="webedit:setdatasource" type="Training.Utilities.BaseCore.Commands.SetDatasourceIfTemplateSet,Training.Utilities"/>

Then the button will only show up if a Datasource Template has been assigned.

How to get a spreadsheet of Sitecore template usage

I wanted to get an overview of all the templates in a Sitecore project along with how many times each has been used.

I thought there might be some marketplace module for doing this but couldn’t find one, nor could I find a suitable report in the ASR module.

So I wrote a little aspx script to write this out, hopefully it will be useful to someone:

<%@ Page Language="C#" AutoEventWireup="true" %><%

Response.ContentType = "text/csv";
var db = Sitecore.Data.Database.GetDatabase("master");
var templates = db.GetItem("/sitecore/templates/User Defined");
foreach (var template in templates.Axes.GetDescendants())
{
	if (template.TemplateName == "Template")
	{
		var usage = Sitecore.Globals.LinkDatabase.GetReferrerCount(template);

		if (template.Children["__Standard Values"] != null)
			usage--;

		Response.Write(template.ID + "," + template.Paths.Path + "," + usage + "," + Environment.NewLine);
	}
}

%>

Style up an sc:link field for Sitecore Page Editor

If you have a normal Link field which you render using an <sc:link /> control then you can select the link in a nice friendly way when editing through the Page Editor.

However if you have a custom css class to style your link then you might expect the link field to use that style in edit mode. Here’s an example link and the HTML we want it to render:

<a class="arrow-link" href="/">Read more</a>

However, when converted into an <sc:Link CssClass=”arrow-link” /> this is what Sitecore renders during edit mode, when you haven’t yet set a link:

Note that this doesn’t include an <a> tag at all. However, it does include the CSS class, albeit encoded into the sc_parameters attribute of the <code> element.

To make it styled-up using the same CSS class I added to the CSS an additional selector for the style:

So now as well as the .arrow-link class applying to actual .arrow-links, it also applies itself to Sitecore’s scTextWrapper span (which is where the [No text in field] is rendered). Now, before you fill it in, it looks like this:

Nice. This really helps if you have lots of similar-looking fields (e.g. Text, Links, etc) all below each other, as the editor can see which is meant for which. I would like to see if anyone has a nicer way of doing this by extending Sitecore, but I thought doing it in CSS would be a simple workaround.

Web Deploy Public Port 80 Warning

When installing web deploy DO NOT install the Remote Agent Service!

If you do, it will listen unsecured on public port 80 on the server, locked down only by username/password.

msdeploy


It listens at:

http://<site>/MsDeployAgentService

If it is running you can browse to that URL and it will ask for username/password. If this happens you should do a Change install and remove the remote agent service, or disable it!