Introduction
My previous post talked about configuring Redmine issue tracker and project management system to link in to Subversion. This post will focus on tweaking your svn setup to make it as easy as possible to associate checkins with redmine issues.
Showing related commits in redmine relies on developers remembering to enter issue numbers in their commit messages. On Windows, we use TortoiseSVN, and it turns out this has issue tracker support built-in. If you go to a top level checked-out folder (e.g. trunk) and open TortoiseSVN > Properties, then click New > Bugtraq, you will see this dialog:
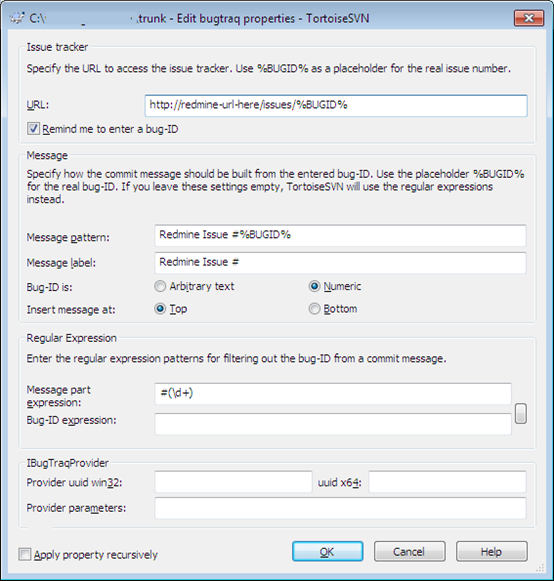
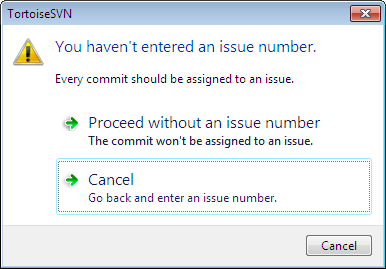
This configures a number of useful features. The first thing is the URL of your issue tracker. This means when viewing the svn log, you can click on issue numbers and it will open the issue in your web browser. Remind me to enter a bug ID means if you forget to enter an issue number, Tortoise will warn you:
Next are the message settings. What this enables is a dedicated box in your commit window for entering issue numbers:
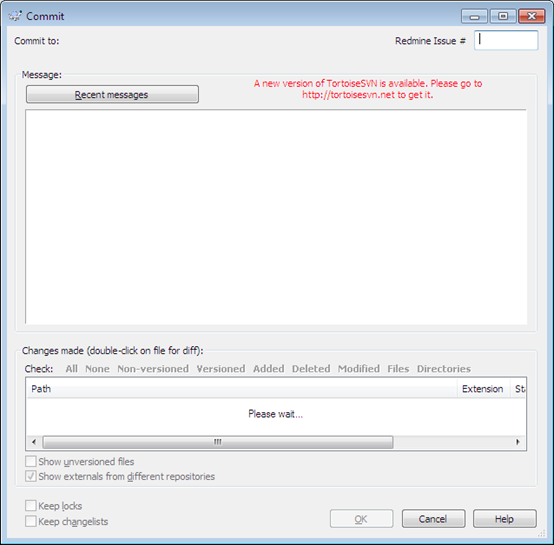
The implementation is quite basic, because Subversion doesn’t natively support issue numbers, whatever you enter in the box is put into the commit message either at the start or end, in the format specified by Message pattern. We have it set so that you simply enter the number in the box, and it prepends it with “Redmine Issue #” which is picked up by Redmine.
The Regular expression setting allows you to enter an expression which will recognise issue numbers when entered manually in the commit message. This is useful as you can enter multiple issue numbers and include a comment about each one. We have this set to recognise simply “#1234”, to match our Redmine setting.
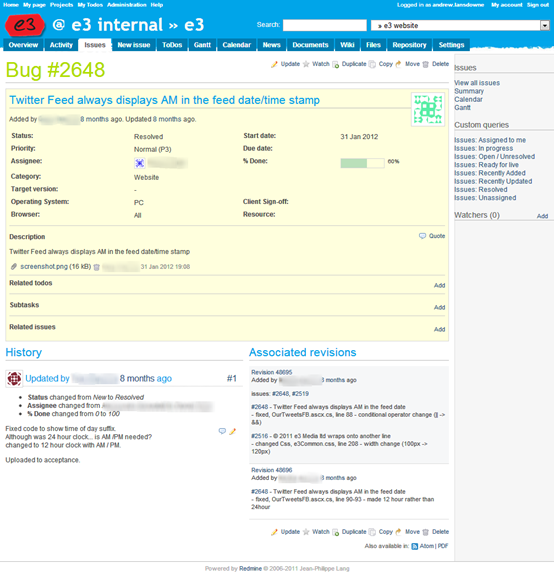
Once this is set up, if you Show Log you will see an extra column dedicated to showing the issue numbers:
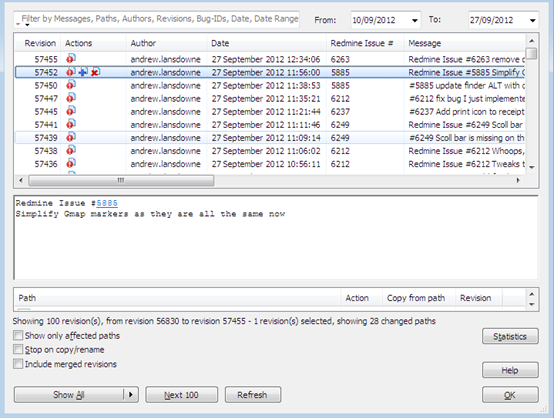
Notice how some issues have been entered via the “Redmine Issue #” box, and others entered plain in the commit message, but all are recognised and shown in the column. In the commit message you can see that the issue number is hyperlinked to the Redmine issue page.
We also find it useful that you can search for issue numbers in the log (or merge) dialog to quickly find all revisions relating to an issue.
As a bonus you may be interested in this Tortoise plugin which allows you to pick issue(s) from a list directly from the commit dialog, and automatically populate the comment: http://code.google.com/p/redmine-projects/
Gotchas
If you set this up as per the above, there is one problem you will likely come across. This is that after a commit, the revision will not immediately show up on the issue page in Redmine. It will only show up after you have browsed to the Repository tab, which is when Redmine refreshes its repository history.
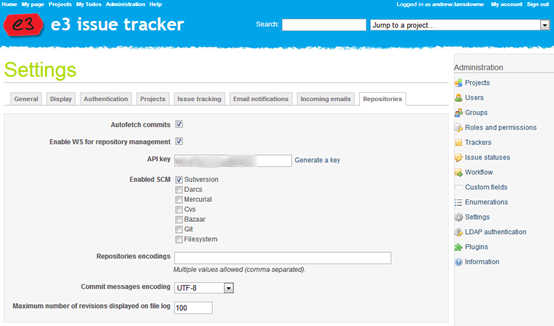
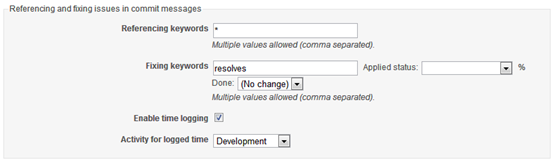
To solve this, first go back to Redmine Repository settings and enable the WS for repository management, and generate an API key:

Now, you need to set up a post-commit hook which will ping Redmine every commit, to instruct it to update its repository cache. We use VisualSVN Server, and in this you go to the repository properties, Hooks, Post-commit hook. In theory, this is as simple as adding this command to the hook:
wget http://redmine-url-here/sys/fetch_changesets?key=api-key-here -O – -o NUL
This will do the job. However, if you have an active repository we have found that during a busy period Redmine will get too many requests to this web service and it will slow down and eventually crash. To work around this, we have instead set the post-commit hook to populate a text file using this command:
echo %2 > “c:\scheduled tasks\update-redmine.txt”
This will put the latest revision number into that text file whenever a commit is made. Then we have a batch file which is set up as a scheduled task to run every minute (but not if it is already running), containing:
IF EXIST update-redmine.txt wget http://redmine-url-here/sys/fetch_changesets?key=api-key-here -O – -o NUL
IF EXIST update-redmine.txt DEL update-redmine.txt
Essentially we are using the presence of the text file to denote that commits have been made and Redmine needs to be updated. This ensures that the web service is only called a maximum of once per minute, and never concurrently.
Summary
We have been very impressed with Redmine, and getting it fully integrated with Subversion has helped make it an integral part of our development process. If you’re using Redmine then be sure to set it up with your version control system for maximum benefit!