Introduction
Here at e3 we use the open source Redmine project management and issue tracking tool. We chose it for its issue tracking features but we’ve been surprised by how many other useful features it has such as wikis, forums, gantt charts, documents, repository integration, etc. It’s also been very reliable and there’s heaps of plugins available to add more features.
We spent a lot of time integrating Redmine as tightly as possible with our source control system (Subversion) and this is what I am going to go through here. It was through various sets of documentation, and trial and error, that we have got to what we feel is a very nice link between these two systems.
Redmine setup
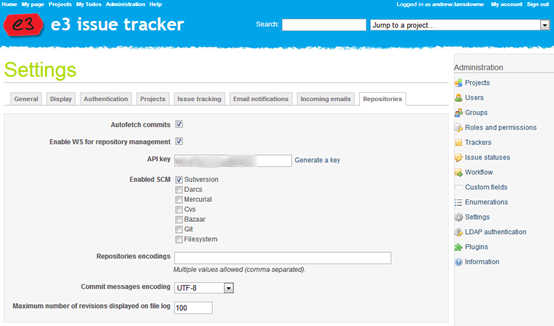
The first thing you need to do is to enable repositories in Redmine settings. Enable “Autofetch commits” and Redmine will update from your repository automatically when you view a repository page. The webservice and API key we will come back to later.
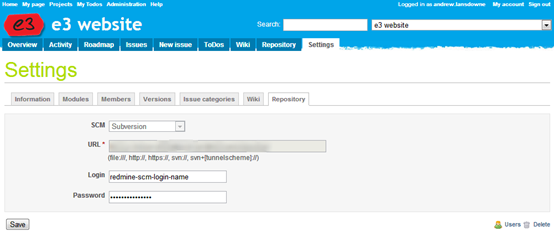
Once you have done this, you will be able to edit any project and configure the repository tab. Make sure you enable the Repository module first, then configure it by entering the URL to the project root. In Subversion this is usually the folder above trunk. Enter a login which has read access to the repository, Redmine will use this to fetch commits.
Note that if you make use of sub-projects, you only need to configure the repository on the top level project, and all the features below will become available in the sub projects.
Now you can click on the Repository tab and Redmine will download the history of the repository into its database. For a large repository this will take a while. We have found that in some cases Redmine will struggle to respond to normal requests while this is happening, so I recommend if adding an existing repository then you do this at the end of the working day when no-one is relying on Redmine.
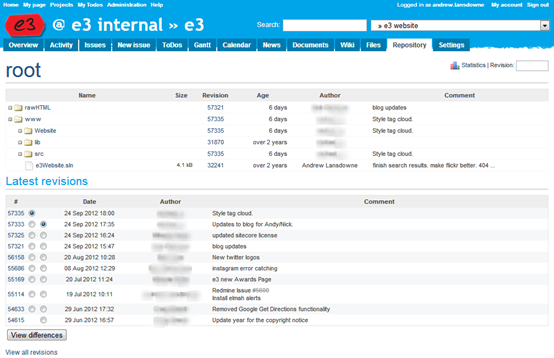
There is an excellent repository browser at the top, and a list of recent revisions underneath, and of course it shows the commit message. If you click on a folder in the repository browser then the list of revisions only shows those which affect that part of the tree. You can also view diffs between any two revisions right within Redmine, either inline or side-by-side:
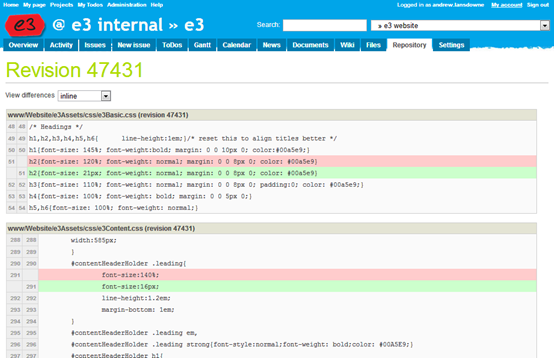
Now in the rest of the project you can use the syntax “r123” to link to a particular revision. So in issue descriptions, comments, wiki pages, you can use this to link to the Repository tab showing a particular revision including diff. But what would be really nice is if it automatically pulled in any commits relating to that issue. To enable this, go back to the Redmine Repository settings and look at the second set of settings:
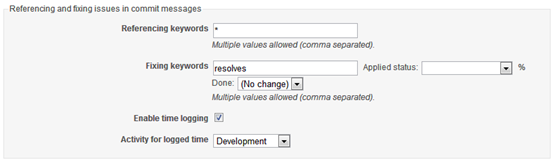
Here you can configure Redmine to identify issue numbers within commit messages. It will always expect them formatted with a leading hash, i.e. “#1234”. Referencing keywords allows you to restrict it further so you have to lead with a word. For example, if you enter “issue” as a referencing keyword, then you will have to enter issue numbers in your commit messages in the format “issue #1234”. If you enter * then it does not require any keyword. It’s worth mentioning you can enter multiple issues into one commit if required, as long as you prefix each with #.
Fixing keywords allow you to automatically change the issue’s status or % done when the issue number is prefixed with that keyword. For example you could set it so that when you include “resolves #1234” then Redmine will change that issue’s status to resolved. We have opted not to use this because we generally like to put a comment into the issue at the same time as resolving it.
Time logging allows you to enter in the commit message the amount of time spent on the issue. We haven’t really used this, but it allows you to enter in the commit message like “#1234 @1h30” and this should be logged in the Spent Time log in Redmine.
Now for the best part. Once this is in place, you can browse to an issue, and you will see the list of Associated revisions which reference that issue (including commit messages). You can click through to the revision in the Repository tab and view the diffs.
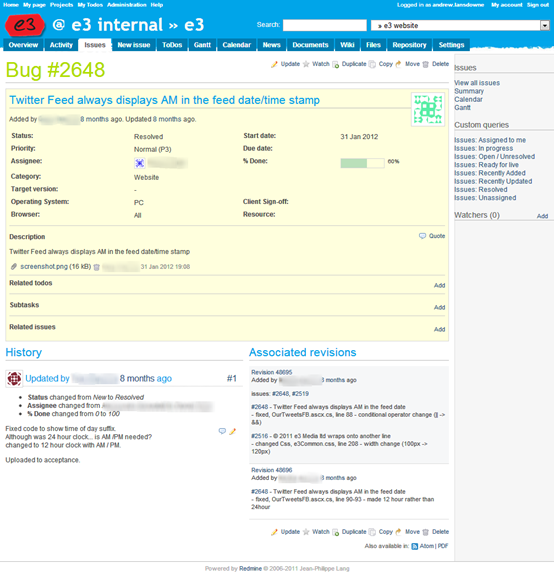
This is very useful when an issue is passed between developers as they can see at once both the history of the issue and the work done on that issue, as well as the code changes.
Nice walk-through, thank you!
Hi,
this is very useful for me being novice with Redmine.
I don’t see the “Associated Revisions” block in our issues (though in the repository list of commits the issue numbers are linked to the issue pages). What could be wrong?
Hi
I believe even when the repository tab is working, the loading of commits and linking to issues will only work if you have enabled “Autofetch Commits” in the redmine settings page. Did you do that? If so maybe it is not working – check the redmine log file.
You can also manually trigger it to load commits for all repositories by calling /sys/fetch_changesets?key= try this – see http://www.redmine.org/projects/redmine/wiki/HowTo_setup_automatic_refresh_of_repositories_in_Redmine_on_commit
Hope that helps
Andy