All posts by rangler2

Auto deploy Sitecore items using Unicorn and TeamCity

I recently discovered the Unicorn project by @kamsar, which implements an event handler to serialize Sitecore items to disk when they are modified, and a sync script which restores them on request.

UPDATE: This post is based on Unicorn 1 and 2. For details of the latest version (4) see the Unicorn github page. Also I have published another blog post about getting Unicorn items up to Azure web app using VSTS.

There were a few things which I had to figure out when setting this up to use for continuous integration in our environment, so I will outline the process.

Install and configure Unicorn

First, install the Unicorn nuget package.

Second, configure it to work on only the developer-owned items in your Sitecore tree. For these items we will consider the ‘master’ copy is that in source control, just like your codebase. The configuration is in /App_Config/Include/Serialization.config and I modified mine thus:

<sitecore>
 <serialization>
  <default>
   <include database="master" path="/sitecore/layout/Layouts/SITE" />
   <include database="master" path="/sitecore/layout/Placeholder Settings/SITE" />
   <include database="master" path="/sitecore/layout/Renderings/SITE" />
   <include database="master" path="/sitecore/layout/Sublayouts/SITE" />
   <include database="master" path="/sitecore/media library/System/SITE" />
   <include database="master" path="/sitecore/templates/SITE" />
  </default>
 </serialization>
</sitecore>

Where SITE is a site-specific named folder containing all our site-specific items.

Next, serialize each of these Items using the Serialize Tree option in Sitecore’s Developer toolbar, and commit the serialized files from the $data/serialization folder.

From now on, when any of these items is modified in Sitecore, the corresponding file(s) will be modified and you can commit them along with code changes. These can be merged into your test / production branch along with other code.

Get the serialized files to be deployed

This step depends on your setup, but we set up our TeamCity CI to use WebDeploy to publish the Web Application Project to the server as per Troy Hunt’s article.

To get our items to be deployed required two things:

  1. Serialization folder must be under Website. I moved it to /App_Data and changed the path in Web.config
  2. An additional build step to sync the serialization folder:
C:\Program Files\IIS\Microsoft Web Deploy\msdeploy -verb:sync -source:contentPath=%teamcity.build.checkoutDir%\www\Website\App_Data\serialization -dest:contentPath=%env.DeployIisAppPath%/App_Data/serialization,wmsvc=https://%env.TargetServer%,userName=%env.PublishUsername%,password=%env.PublishPassword% -allowUntrusted

This ensures that when the build runs, new items will be added and old ones deleted to match what is in version control.

Get the items to be installed on build

This is done by the sync-database.aspx script included with Unicorn.

It will install the items if you are logged in as an Administrator, or if you include an Authenticate header matching a preconfigured token.

So add an app setting:

<add key="DeploymentToolAuthToken" value="{GUID OR TOKEN HERE}"/>

And then to make TeamCity call the script with the token I used wget (install for Windows here) and added a command line build step in TeamCity with the script:

C:\Program Files (x86)\GnuWin32\bin\wget %env.SyncScriptURL% -O - --header=Authenticate:%env.SyncScriptToken%

Then, if the build is successful, the script will run and Sitecore DB will be updated. In case it fails it should return non-200 and TeamCity flags this as an error.

We decided it would be ideal to publish the items as well as installing them into master db, so I added the following code into the sync-database.aspx.cs :

 /// <summary>
 /// Publish the preset folder as per docs in http://sdn.sitecore.net/upload/sitecore6/64/content_api_cookbook_sc64_and_later-usletter.pdf
 /// </summary>
 /// <param name="preset"></param>
 private static void PublishPreset(IncludeEntry preset)
 {
  if (preset.Database == "master")
  {
   Sitecore.Data.Database master = Sitecore.Configuration.Factory.GetDatabase("master");
   Sitecore.Data.Database target = Sitecore.Configuration.Factory.GetDatabase("web");
   Sitecore.Data.Items.Item home = master.GetItem(preset.Path);
   Sitecore.Data.Database[] targetDatabases = { target };
   Sitecore.Globalization.Language[] languages = master.Languages;
   bool deep = true;
   bool compareRevisions = true;
   Sitecore.Publishing.PublishManager.PublishItem(home, targetDatabases, languages, deep, compareRevisions);
  }
 }

I call this code from within ProcessPreset:

new SerializationLoader().LoadTree(
 new AdvancedLoadOptions(preset)
 {
 Progress = progress,
 ForceUpdate = false,
 DeleteOrphans = true
 });

PublishPreset(preset);

Now my items are installed and published on deploy.
Strongly typed repeaters in ASP.NET 4.5 (Sitecore 7)

If you use Web Forms then this might be helpful.

In a Repeater (and other data binding container controls) instead of something like this:

<%# ((Sitecore.Data.Items.Item)Container.DataItem)["Field"] %>

You can now do this:

<%# Item["Field"] %>

If you include this Repeater attribute:

ItemType="Sitecore.Data.Items.Item"

We can do this with Sitecore 7 J

For more information http://stackoverflow.com/questions/937244/strong-typed-container-in-webforms

Debug compiled code on a remote server

This might come in handy sometime if you really need to debug something on a server where you can’t run (or connect to) a remote debugger.

  • Upload the codebase (src and sln) to the web server (from the correct branch)
  • Open sln in Visual Studio 2012 Express on the server
  • Change web config debug = true
  • Open web site project properties, web, set the server to Use Custom Web Server,  put the site URL in
  • Press play
  • You are now debugging on the server

Remote Desktop Connection Manager

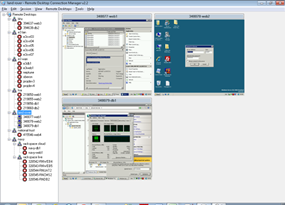
If you have a lot of servers that you connect to remote desktop, then this tool is for you. You can organise your servers into a folder structure, set up default connection settings on folders that are inherited down to each connection, and save login details (encrypted against your user account).

Then you can connect all servers in a group at once, see (and interact with) many screens at a time, or switch between servers easily. Basically makes having multiple RDP connections much easier.

You can download the tool from http://www.microsoft.com/en-us/download/details.aspx?id=21101 or read more at http://blogs.technet.com/b/exchange/archive/2010/06/11/3410093.aspx

Setting up TortoiseSVN to link to Redmine

Introduction

My previous post talked about configuring Redmine issue tracker and project management system to link in to Subversion. This post will focus on tweaking your svn setup to make it as easy as possible to associate checkins with redmine issues.

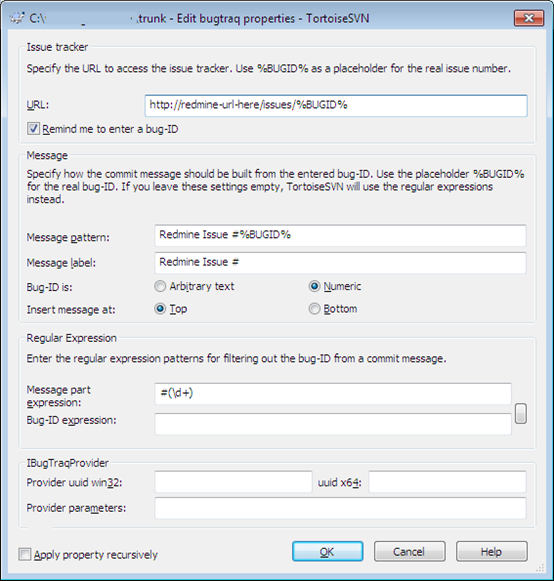
Showing related commits in redmine relies on developers remembering to enter issue numbers in their commit messages. On Windows, we use TortoiseSVN, and it turns out this has issue tracker support built-in. If you go to a top level checked-out folder (e.g. trunk) and open TortoiseSVN > Properties, then click New > Bugtraq, you will see this dialog:

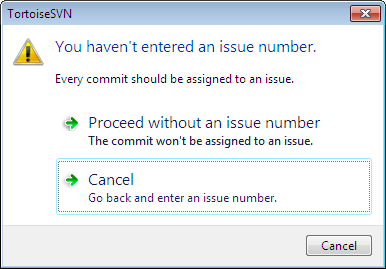
This configures a number of useful features. The first thing is the URL of your issue tracker. This means when viewing the svn log, you can click on issue numbers and it will open the issue in your web browser. Remind me to enter a bug ID means if you forget to enter an issue number, Tortoise will warn you:

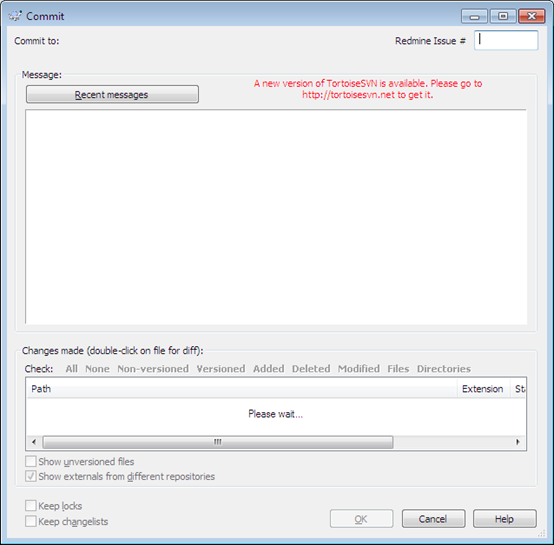
Next are the message settings. What this enables is a dedicated box in your commit window for entering issue numbers:

The implementation is quite basic, because Subversion doesn’t natively support issue numbers, whatever you enter in the box is put into the commit message either at the start or end, in the format specified by Message pattern. We have it set so that you simply enter the number in the box, and it prepends it with “Redmine Issue #” which is picked up by Redmine.

The Regular expression setting allows you to enter an expression which will recognise issue numbers when entered manually in the commit message. This is useful as you can enter multiple issue numbers and include a comment about each one. We have this set to recognise simply “#1234”, to match our Redmine setting.

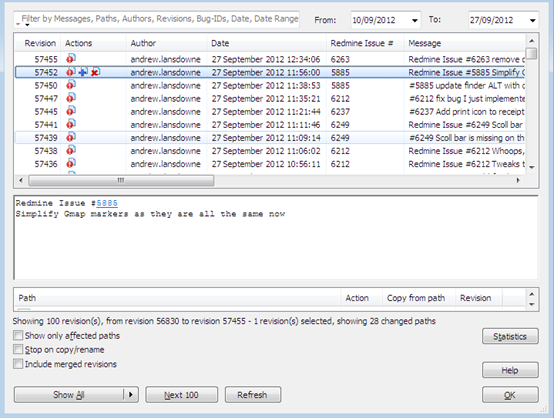
Once this is set up, if you Show Log you will see an extra column dedicated to showing the issue numbers:

Notice how some issues have been entered via the “Redmine Issue #” box, and others entered plain in the commit message, but all are recognised and shown in the column. In the commit message you can see that the issue number is hyperlinked to the Redmine issue page.

We also find it useful that you can search for issue numbers in the log (or merge) dialog to quickly find all revisions relating to an issue.

As a bonus you may be interested in this Tortoise plugin which allows you to pick issue(s) from a list directly from the commit dialog, and automatically populate the comment: http://code.google.com/p/redmine-projects/

Gotchas

If you set this up as per the above, there is one problem you will likely come across. This is that after a commit, the revision will not immediately show up on the issue page in Redmine. It will only show up after you have browsed to the Repository tab, which is when Redmine refreshes its repository history.

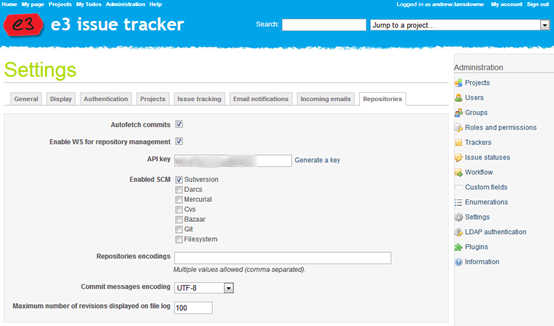
To solve this, first go back to Redmine Repository settings and enable the WS for repository management, and generate an API key:

Now, you need to set up a post-commit hook which will ping Redmine every commit, to instruct it to update its repository cache. We use VisualSVN Server, and in this you go to the repository properties, Hooks, Post-commit hook. In theory, this is as simple as adding this command to the hook:

wget http://redmine-url-here/sys/fetch_changesets?key=api-key-here -O – -o NUL

This will do the job. However, if you have an active repository we have found that during a busy period Redmine will get too many requests to this web service and it will slow down and eventually crash. To work around this, we have instead set the post-commit hook to populate a text file using this command:

echo %2 > “c:\scheduled tasks\update-redmine.txt”

This will put the latest revision number into that text file whenever a commit is made. Then we have a batch file which is set up as a scheduled task to run every minute (but not if it is already running), containing:

IF EXIST update-redmine.txt wget http://redmine-url-here/sys/fetch_changesets?key=api-key-here -O – -o NUL

IF EXIST update-redmine.txt DEL update-redmine.txt

Essentially we are using the presence of the text file to denote that commits have been made and Redmine needs to be updated. This ensures that the web service is only called a maximum of once per minute, and never concurrently.

Summary

We have been very impressed with Redmine, and getting it fully integrated with Subversion has helped make it an integral part of our development process. If you’re using Redmine then be sure to set it up with your version control system for maximum benefit!

Integrating Redmine with Subversion

Introduction

Here at e3 we use the open source Redmine project management and issue tracking tool. We chose it for its issue tracking features but we’ve been surprised by how many other useful features it has such as wikis, forums, gantt charts, documents, repository integration, etc. It’s also been very reliable and there’s heaps of plugins available to add more features.

We spent a lot of time integrating Redmine as tightly as possible with our source control system (Subversion) and this is what I am going to go through here. It was through various sets of documentation, and trial and error, that we have got to what we feel is a very nice link between these two systems.

Redmine setup

The first thing you need to do is to enable repositories in Redmine settings. Enable “Autofetch commits” and Redmine will update from your repository automatically when you view a repository page. The webservice and API key we will come back to later.

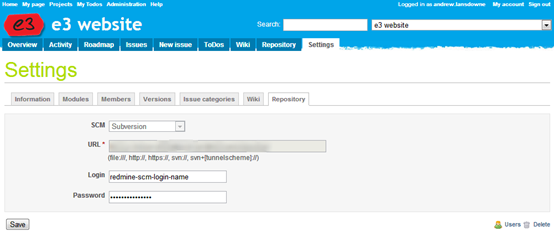
Once you have done this, you will be able to edit any project and configure the repository tab. Make sure you enable the Repository module first, then configure it by entering the URL to the project root. In Subversion this is usually the folder above trunk. Enter a login which has read access to the repository, Redmine will use this to fetch commits.

Note that if you make use of sub-projects, you only need to configure the repository on the top level project, and all the features below will become available in the sub projects.

Now you can click on the Repository tab and Redmine will download the history of the repository into its database. For a large repository this will take a while. We have found that in some cases Redmine will struggle to respond to normal requests while this is happening, so I recommend if adding an existing repository then you do this at the end of the working day when no-one is relying on Redmine.

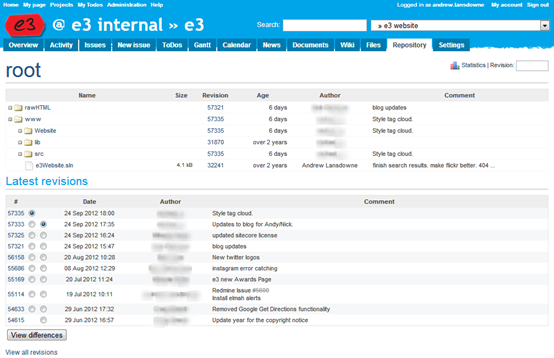
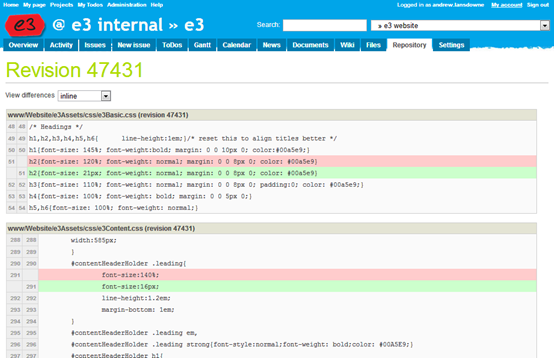
There is an excellent repository browser at the top, and a list of recent revisions underneath, and of course it shows the commit message. If you click on a folder in the repository browser then the list of revisions only shows those which affect that part of the tree. You can also view diffs between any two revisions right within Redmine, either inline or side-by-side:

Now in the rest of the project you can use the syntax “r123” to link to a particular revision. So in issue descriptions, comments, wiki pages, you can use this to link to the Repository tab showing a particular revision including diff. But what would be really nice is if it automatically pulled in any commits relating to that issue. To enable this, go back to the Redmine Repository settings and look at the second set of settings:

Here you can configure Redmine to identify issue numbers within commit messages. It will always expect them formatted with a leading hash, i.e. “#1234”. Referencing keywords allows you to restrict it further so you have to lead with a word. For example, if you enter “issue” as a referencing keyword, then you will have to enter issue numbers in your commit messages in the format “issue #1234”. If you enter * then it does not require any keyword. It’s worth mentioning you can enter multiple issues into one commit if required, as long as you prefix each with #.

Fixing keywords allow you to automatically change the issue’s status or % done when the issue number is prefixed with that keyword. For example you could set it so that when you include “resolves #1234” then Redmine will change that issue’s status to resolved. We have opted not to use this because we generally like to put a comment into the issue at the same time as resolving it.

Time logging allows you to enter in the commit message the amount of time spent on the issue. We haven’t really used this, but it allows you to enter in the commit message like “#1234 @1h30” and this should be logged in the Spent Time log in Redmine.

Now for the best part. Once this is in place, you can browse to an issue, and you will see the list of Associated revisions which reference that issue (including commit messages). You can click through to the revision in the Repository tab and view the diffs.

This is very useful when an issue is passed between developers as they can see at once both the history of the issue and the work done on that issue, as well as the code changes.

Setting up a remote PTZ webcam

I recently bought a cheap PTZ webcam from eBay which I was amazed you could get for under £30 and had some fun setting it up as a webcam for watching Poppy.

Search for wireless ip camera, buy it now, In the UK, sort by price & postage, and buy the first one that looks like this (there’s various colours available):

m7biqfU9g9VGe6a7leWqmKA


It has built-in wifi, ethernet, microphone, speaker, infra-red lights to see in the dark. And you can control it remotely!

Set up is not for the non-technical, and the manual (if you get one) is likely not very readable, but if you enjoy networking you’ll be fine. It can be done just thru a web browser like configuring a router, or you can try to use the software supplied. I think it advertises a public wifi access point by default, so you can connect to this and browse to its IP address to configure it (give it your wifi details). If that doesn’t work you can connect it to your router over ethernet and you should find it on your local network.

Once you can access it on your LAN, you can get an app on your mobile device of choice. Most IP cam viewer apps should work, my favourite free one was CamViewer for iOS – it’s free and you can control the video full screen by holding corners of the screen. When you hold it portrait you can also do audio, change resolution, etc.

You can access it from anywhere if you set up port forwarding on your router to direct a port on your public IP to your cam’s IP. If you have a dynamic IP you need to use some kind of dynamic DNS provider such as no-ip.com or dyndns.org or the freebie one that might come pre-setup and written on the base of your camera!

You might want to set up a custom webpage where you can view and control your camera. There is help for you in the form of DigitalHam. This guy figured out that the camera accepts control requests at a specific URL where you supply username, password, and control param. His demo cam example is here. I made one too but the cam is offline most of the time now. View source to check it out.


Traffic Simulation using Agent-Based Modelling

Once upon a time I did a project at university on traffic simulation. In case you’re interested, here is some information about it.

I used NetLogo, an agent-based modelling (ABM) environment, to design and implement a simple working traffic simulation model.

This is quite a cool piece of software and if you’re interested in multi-agent modelling I recommend you check it out. There’s loads of online models you can run in your browser.

You can read more about the project here.